
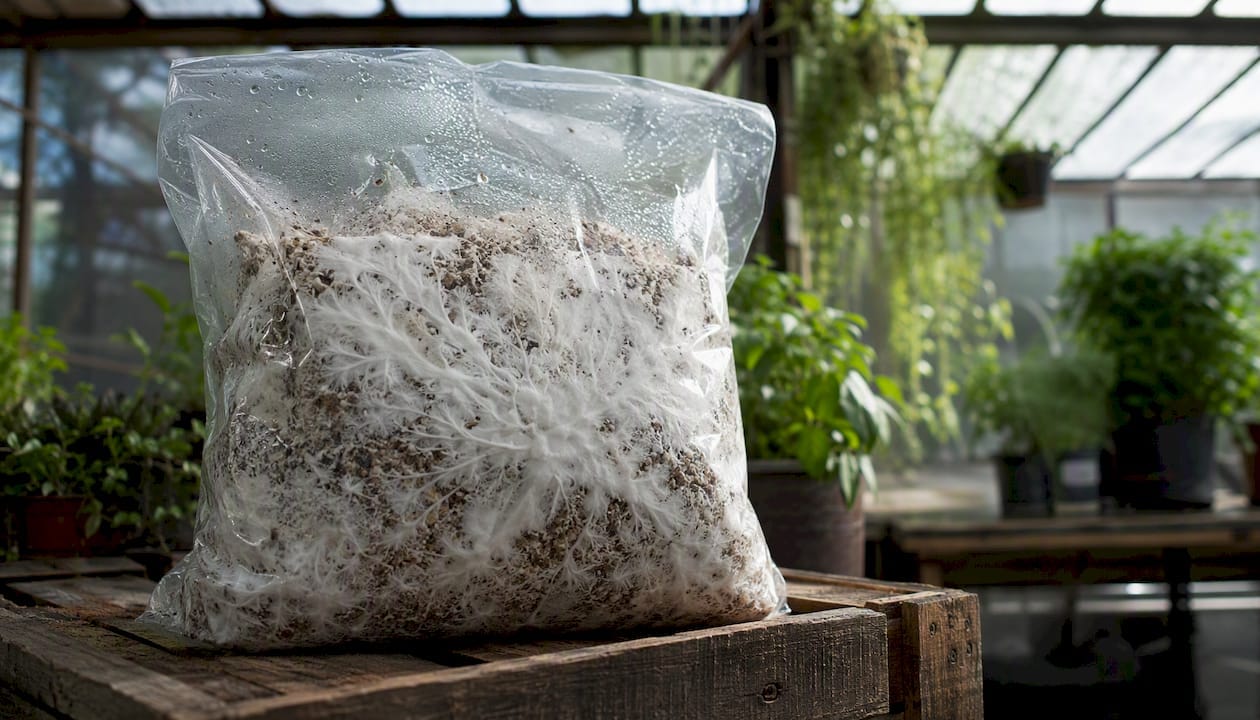
Healthy mycelium is bright white, spreads evenly across the substrate, carries a clean earthy smell, and shows either ropey or fluffy three-dimensional texture throughout. Those four signals together tell you a run is on track. Here is what to do with that information right now:
- Looks healthy (bright white, steady advance, earthy smell): wait and monitor; check again in 24 hours.
- Uncertain (early white fuzz, no smell yet): quarantine the container and re-check in 48–72 hours. Most contaminants will show colour changes or rapid spread within that window.
- Obvious contamination (green, black, pink, sour smell): bag immediately and discard.
Keep your incubation space in a temperature range that suits most cultivated species and helps keep contaminant pressure low. Sporebuddies recommends this range for UK home growers, where ambient temperatures can dip unpredictably.
Table of Contents
- What do the signs of healthy mycelium growth look like?
- Rhizomorphic vs tomentose: which texture is healthier?
- How healthy mycelium appears on different substrates
- What does healthy mycelium smell like?
- Typical colonisation timelines in UK conditions
- How to tell contaminants apart from healthy mycelium
- Simple tools for monitoring mycelium health daily
- How to tell when colonisation is complete and ready for the next stage
- Quick troubleshooting when growth is slow, uneven, or suspicious
- Key takeaways
- Getting the right supplies makes healthy colonisation easier
- FAQ
What do the signs of healthy mycelium growth look like?
Healthy mycelium is bright white to slightly off-white or cream. The exact shade varies by species, but the colour should be consistent across the entire colonised area. Any green, blue-green, black, pink, or vivid orange patches are contamination signals, not normal variation.
The growth edge is where you learn the most. A healthy advancing front looks feathery, with fine threads pushing outward in all directions. You should not see unnaturally sharp circular rings or a flat painted-on appearance. When you hold the container up to a light source and look from the side, healthy mycelium has visible depth. It looks three-dimensional, almost like a layer of dense cotton pressed against the glass.
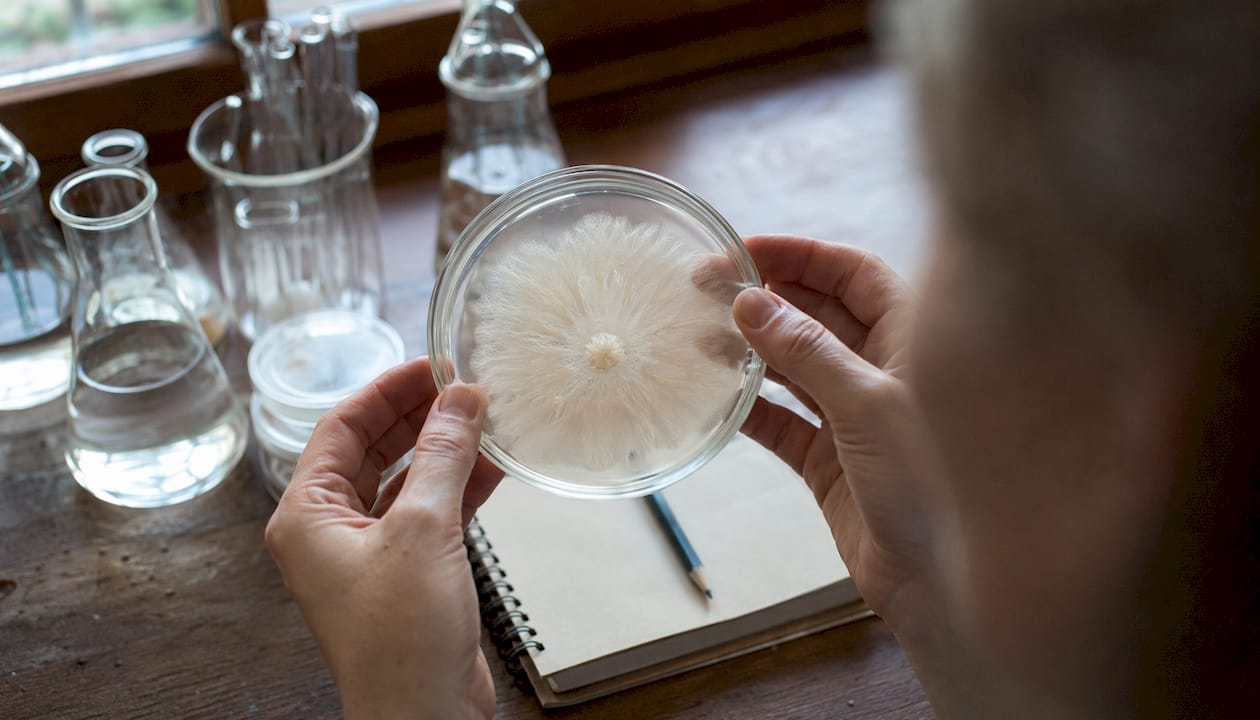
Coverage cues are worth tracking mentally as a percentage. As colonisation progresses, white patches spread from inoculation points and increasingly merge, with the substrate surface becoming more uniformly white over time. Full coverage means the entire visible surface is white, though interior consolidation takes a few more days.
Colour comparison at a glance:
| Colour observed | What it likely means |
|---|---|
| Bright white to cream | Healthy mycelium |
| Yellow or amber patches | Possible metabolite or stress response |
| Green or blue-green | Trichoderma or similar mould |
| Black specks or patches | Aspergillus or other dark mould |
| Pink or red tones | Bacterial or fungal contamination |
Rhizomorphic vs tomentose: which texture is healthier?
Two distinct growth patterns are both considered healthy, and knowing the difference saves a lot of unnecessary worry.
Rhizomorphic mycelium looks ropey and cord-like, with thick strands running through the substrate like a network of cables. This pattern is associated with vigorous genetics and tends to pin faster. Oyster species, for example, often show aggressive rhizomorphic growth that can cover grain in under two weeks under good conditions.
Tomentose mycelium is fluffy and cottony, more like a soft mat than a network of ropes. It is not a sign of poor health on its own. Lion’s Mane grows this way naturally and colonises more slowly than oyster species. If a culture that typically shows rhizomorphic growth suddenly shifts to a tomentose pattern, that can indicate stress or a less vigorous genetic line, but it is not an automatic red flag.
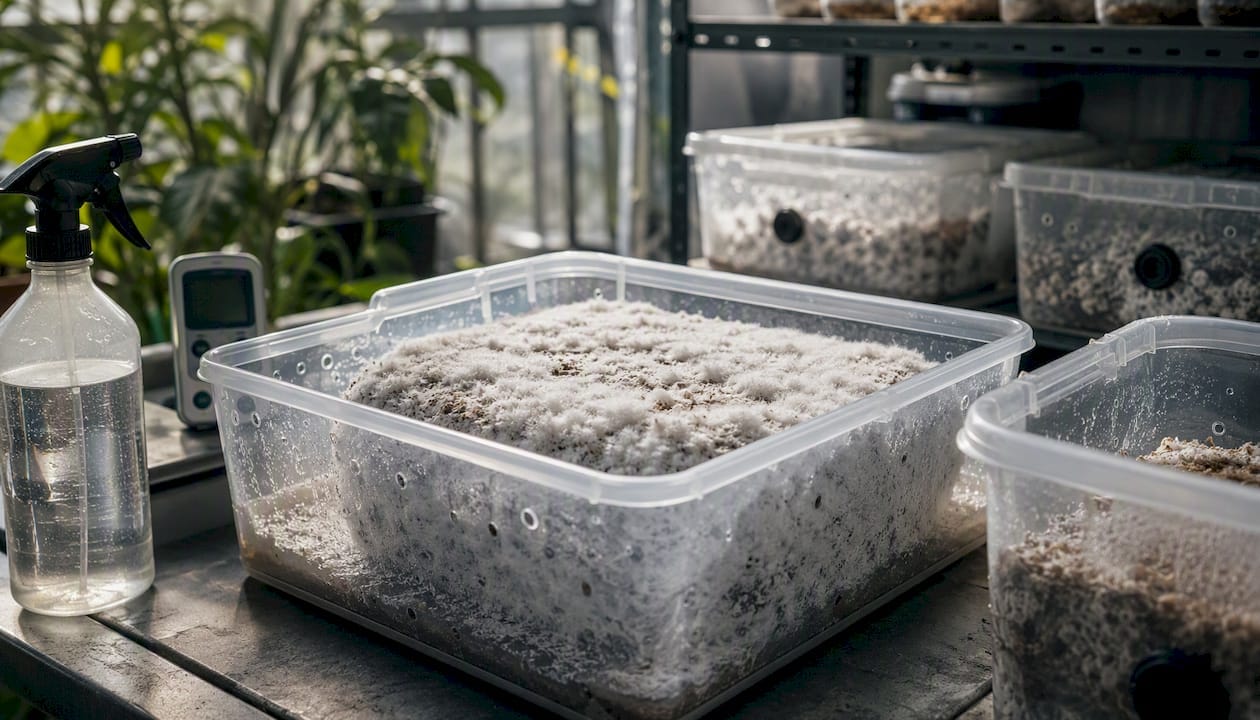
Species-dependent growth patterns mean you should always calibrate your expectations to the strain you are working with, not a generic standard.
Pro Tip: Side-light your jar or bag with a torch held flat against the side. Healthy mycelium, whether rhizomorphic or tomentose, will look opaque and three-dimensional. Early-stage white contamination often appears flatter and slightly translucent by comparison. This one check takes ten seconds and catches problems before they spread.
For a deeper look at how these patterns develop, the Sporebuddies guide on mycelium growth patterns covers the underlying biology clearly.
How healthy mycelium appears on different substrates
Growth looks different depending on what the mycelium is colonising. Generic advice often misses these distinctions, so here is what to expect on each common substrate.
Agar plates
On agar, healthy mycelium forms even, circular radial fronts that advance steadily from the inoculation point. The colony should look fluffy and consistent in density. Cloudiness in the agar medium itself can indicate bacterial contamination. Sectoring, where the colony develops wedge-shaped zones of different texture or density, suggests mixed genetics rather than contamination, but it does mean you may want to isolate a single vigorous sector for cleaner future transfers. If you are preparing or working with plates, Sporebuddies stocks agar and growth medium supplies suited to home lab work.
Grain spawn
Healthy grain spawn shows individual grains coated in white, ropey mycelium. The grains should still be individually visible, but they bind together into a solid mass as colonisation completes. Wet, slimy, or translucent grains are a clear sign of bacterial contamination. Mushy texture is another red flag. If the bag or jar smells sour alongside those visual signs, discard without hesitation.
Bulk substrate (sawdust, coir, compost)
On bulk substrate, look for uniform white consolidation spreading steadily through the block or tub. There should be no damp, slimy pockets and no areas where the substrate looks wet or discoloured. A gentle shake of a grain spawn jar at this stage should produce a solid, bound mass rather than loose rattling grains. That firmness confirms interior consolidation, not just surface coverage.
| Substrate | Healthy visual signs | Early warning signs |
|---|---|---|
| Agar | Even circular front, fluffy colony, consistent density | Cloudiness, sectoring, irregular edges |
| Grain spawn | White-coated grains, solid bound mass | Slimy/translucent grains, mushy texture |
| Bulk substrate | Uniform white consolidation, firm block | Slimy pockets, discolouration, wet patches |
What does healthy mycelium smell like?
Smell is one of the fastest diagnostics available to you, and it often signals a problem before you can see it clearly.
Healthy mycelium smells clean and earthy, faintly mushroomy, and sometimes slightly sweet or nutty depending on the species. It should never smell sour, fermented, ammonia-like, or putrid. Those offensive odours reliably indicate bacterial contamination.
Here is a quick smell reference:
- Clean, earthy, faintly mushroomy: healthy; continue monitoring normally.
- Mild, pleasant, slightly sweet: healthy; some species produce this naturally.
- Faint amber or slightly sweet metabolite smell: monitor closely; check for yellow liquid droplets and improve airflow before deciding to discard.
- Sour or fermented: quarantine immediately; bacterial contamination is likely.
- Ammonia-like: strong indicator of bacterial activity; discard unless the smell clears within 24 hours with improved ventilation.
- Putrid or rotten: discard immediately; do not open the container indoors.
Small yellow or amber liquid droplets on the surface are not automatically a contamination sign. These are often natural metabolites produced under mild stress, such as a temperature fluctuation or slight moisture imbalance. Small droplets with no accompanying bad smell: monitor and adjust the environment. Large pools of liquid combined with a sour smell: discard.
Typical colonisation timelines in UK conditions
Knowing what “on track” looks like at each stage stops you from either panicking too early or missing a genuine problem.
- Agar plates (3–10 days): Most strains show visible radial growth within a few days at appropriate incubation temperatures, with daily advance rates varying depending on species and conditions. Clean, even fronts by day 10 are a good sign. Slower advance on agar usually points to a temperature issue rather than contamination.
- Grain spawn (10–16 days for full colonisation): Some fast species can colonise grain in relatively short periods under ideal conditions, while slower species or cooler ambient temperatures may require more time. Allow a few extra days for consolidation before using the spawn, even when the surface looks fully white.
- Bulk substrate (14–25 days for full surface colonisation): The range here is wide because spawn rate, species, and substrate composition all affect speed. Surface coverage appearing white does not mean the interior is fully colonised. Wait an additional 2–5 days after the surface appears fully white before moving to fruiting conditions. This consolidation window significantly reduces the risk of bacterial blooms at transfer.
- Temperature matters throughout: UK homes can drop below 18°C in winter, which slows colonisation noticeably. A small heat mat or incubation chamber keeps temperatures stable. Sporebuddies carries environmental control equipment designed for exactly this purpose.
How to tell contaminants apart from healthy mycelium
The most common contaminants each have distinct characteristics. Knowing them prevents both premature discards and costly mistakes.
| Contaminant | Colour/appearance | Spread rate | Smell | Immediate action |
|---|---|---|---|---|
| Trichoderma | Starts white, turns green/blue-green when sporulating | Fast | Musty or neutral | Discard immediately once colour appears |
| Cobweb mould | Wispy, translucent, web-like | Very fast (visible change in ~24 hours) | Neutral | Quarantine; monitor for 24 hours |
| Aspergillus | Dark specks or patches (black, dark green) | Moderate | Musty | Double-bag and discard carefully |
| Bacterial wet spot | Yellowish, slimy patches | Variable | Sour, ammonia | Quarantine; discard if smell persists |
Trichoderma is the most common threat in home cultivation. It often starts as white growth that looks almost identical to healthy mycelium, then rapidly turns green or blue-green as it sporulates. Once you see that colour change, the jar is lost. Toss it immediately and check neighbouring containers.
Cobweb mould is frequently mistaken for aerial mycelium because it is white and wispy. The key difference is translucency and speed. Cobweb mould doubles in visible area in roughly 24 hours and looks flat and web-like rather than opaque and three-dimensional. Healthy aerial mycelium has depth and density.
Aspergillus and other dark moulds present as distinct dark specks or patches. These carry a respiratory hazard when disturbed. Double-bag the container before discarding and avoid opening it indoors.
Bacterial wet spots produce a yellowish, slimy appearance paired with a sour or ammonia smell. Never open a heavily contaminated container indoors. For detailed disposal and quarantine protocols, the Sporebuddies guide on contamination in cultivation covers safe handling step by step.
Simple tools for monitoring mycelium health daily
You do not need expensive equipment to catch problems early. A small toolkit used consistently makes a real difference.
- Torch/flashlight: Use it for side-lighting as described above. Hold it flat against the container wall and look for three-dimensional opacity. Takes seconds and reveals depth that overhead lighting misses.
- Hygrometer: Place it at substrate level inside your incubation space, not at the top of the chamber where readings can be misleading. Most cultivated species prefer high relative humidity during colonisation to support healthy mycelial growth.
- Thermometer or temperature probe: Check incubation temperature twice daily if you are not using a controller. Fluctuations outside 18–24°C are the most common cause of stalled colonisation in UK homes.
- Camera or phone with dated notes: Take a photo from the same angle each day. Side-by-side comparisons over 48 hours reveal whether growth is advancing, stalling, or changing colour in ways that are easy to miss in real time.
Quick daily checks to run through:
- Smell the container briefly without opening it (sniff around the filter patch or lid seal).
- Check surface texture and colour for any new patches or discolouration.
- Note condensation levels on container walls.
- Measure the advance of the growth front against yesterday’s photo.
The mycology equipment range at Sporebuddies includes thermometers, hygrometers, and other monitoring tools suited to home cultivation setups.
How to tell when colonisation is complete and ready for the next stage
Full surface coverage is not the finish line. It is the starting point for a short consolidation check before you move to fruiting or transfer.
The primary readiness signals are 100% surface coverage plus 2–5 days of additional consolidation time. For some species, you may also see visible hyphal knots or early pinning at the surface, which is a strong positive sign that the mycelium is ready to fruit.
For grain spawn, the grab test is the most reliable physical check: pick up the jar or bag and squeeze gently. Fully colonised grain binds into a solid puck rather than shifting loosely. If the grains still rattle or slide freely, give it another 48 hours and test again.
For bulk substrate, look for white consolidation visible through the container sides and a firm, cohesive feel when you press the outside of the bag or tub. Soft, wet, or uneven areas suggest incomplete interior colonisation.
Next steps:
- Ready: proceed to casing or fruiting conditions and increase fresh air exchange.
- Not sure: wait and re-check the interior, or run a shake test on grain spawn to redistribute and speed up the final stages.
The Sporebuddies home growing guide walks through the full transition from colonisation to fruiting in practical detail.
Quick troubleshooting when growth is slow, uneven, or suspicious
Work through these checks in order before deciding to discard or intervene.
- Check temperature first. Colonisation stalling at 70–80% coverage is most commonly a temperature problem in UK homes, particularly in winter. Confirm your incubation space is holding 18–24°C consistently.
- Check moisture levels. Substrate that is too dry will slow growth and cause the mycelium to look thin and wispy. Too wet, and you risk bacterial blooms. The substrate should feel like a wrung-out sponge, not soggy.
- Check gas exchange. Excess CO₂ from a sealed container can stall growth. Confirm your filter patches or polyfill ports are clear and unobstructed.
- Check inoculation rate. A low spawn rate means the mycelium has further to travel and takes longer. This is not a problem to fix mid-run, but it informs your next batch.
- Check for contamination signs. Smell first, then look. If the smell is sour or the texture is slimy, discard. If you see slight yellow metabolite droplets with no bad smell, improve airflow and monitor for 48 hours before deciding.
Decision points:
- Sour smell or slimy texture: discard.
- Small yellow metabolite droplets, clean smell: adjust environment, monitor 48 hours.
- Stalled but clean-smelling and visually uniform: give more time, or run a break-and-shake on grain spawn to redistribute moisture and nutrients.
- Partial contamination confined to one area: quarantine the container and observe; do not transfer.
For a full prevention checklist, the Sporebuddies guide on preventing mould in mushrooms covers environmental controls in detail.
Why smell is your most reliable early warning tool
The safety point here is worth stating plainly: never open a heavily contaminated container indoors. Bacterial aerosols and fungal spores from contaminated cultures can cause respiratory irritation. Double-bag the container before discarding, and check your local council guidance for organic waste disposal if you are unsure. Consult your local authority’s waste guidance for specific disposal requirements in your area.
Key takeaways
Healthy mycelium is bright white, three-dimensional, evenly advancing, and clean-smelling. Those four criteria together are the most reliable indicators of a successful run.
| Point | Details |
|---|---|
| Visual signs | Bright white to cream, opaque, three-dimensional, with a feathery advancing front. |
| Smell rule | Clean and earthy is healthy; sour, ammonia, or putrid means quarantine or discard immediately. |
| Substrate checks | Grain should bind into a solid puck; bulk should feel firm with no slimy pockets. |
| Timeline rule | Wait 2–5 days after full surface coverage before moving to fruiting to allow interior consolidation. |
| Sporebuddies supplies | Reliable UK spawn, substrates, and monitoring equipment to support healthy colonisation from the start. |
Getting the right supplies makes healthy colonisation easier
Starting with quality materials removes one of the biggest variables in home cultivation. Poor-quality spawn or inconsistent substrate is a common cause of slow colonisation and contamination pressure that has nothing to do with technique.
Sporebuddies supplies UK growers with mushroom spores and mushroom substrate products chosen for consistency and viability. Whether you are running your first grain jar or scaling up to bulk blocks, the product range covers the full colonisation process. The grow kits FAQ is a practical first stop if you have questions about contamination, timing, or what to expect at each stage. Browse the full range at Sporebuddies and pick up what you need for your next run.
Useful sources and further reading
- What is mushroom mycelium? A grower’s guide — Sporebuddies primer on mycelium structure and function; good starting point for understanding what you are looking at.
- Mycelium growth patterns explained — Sporebuddies guide covering rhizomorphic and tomentose patterns in more depth.
- Contamination in cultivation — Sporebuddies reference for quarantine protocols, disposal guidance, and contamination types.
- Ways to prevent mould in mushrooms — Sporebuddies environmental control checklist for reducing contamination risk.
- Mushroom bag inoculation steps — Sporebuddies practical guide to correct inoculation technique.
- Wikipedia: Mycelium — Authoritative overview of mycelium biology, hyphal structure, and ecological roles.
- Wikipedia: Trichoderma harzianum — Background on one of the most common cultivation contaminants, including its biology and spread.
- Shroomery cultivation forums — Long-running community resource with practitioner-level discussion on colonisation signs and contamination identification.
FAQ
What does healthy mycelium look like?
Healthy mycelium is bright white to slightly cream, with a fluffy or ropey three-dimensional texture and a feathery advancing growth front. Any green, black, pink, or blue-green colouration indicates contamination rather than normal growth.
What are the early signs of mycelium growth?
The first visible sign is small white patches appearing at inoculation points within a few days, gradually expanding outward with fine radiating threads. At 18–24°C, most species show clear visible growth within 3–10 days on agar.
What does unhealthy mycelium look like?
Unhealthy or contaminated mycelium may show coloured patches (green, black, or pink), slimy or wet textures, unusually fast-spreading wispy growth, or a flat, translucent appearance rather than opaque depth. A sour, ammonia, or putrid smell almost always accompanies bacterial contamination.
How do you tell when mycelium is fully colonised?
Full colonisation means 100% surface coverage plus a solid, puck-like feel when you squeeze grain spawn. For bulk substrate, the block should feel firm throughout. Wait an additional 2–5 days after the surface appears fully white before moving to fruiting conditions to allow interior consolidation.
Are yellow droplets on mycelium a sign of contamination?
Small yellow or amber droplets are often natural metabolites produced under mild stress, not automatic contamination. If the droplets are small and the smell remains clean and earthy, adjust your environment and monitor. Large pools of liquid combined with a sour or ammonia smell indicate bacterial contamination and warrant discarding.