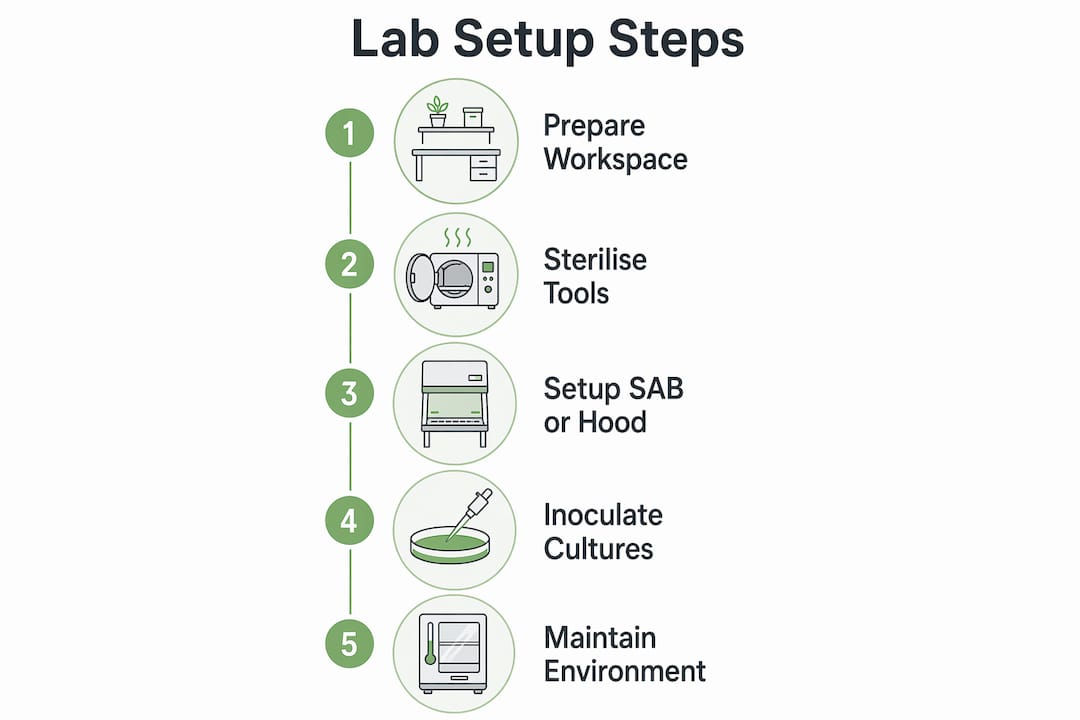
A mushroom lab is defined as a sterile, controlled workspace designed to support spawn production, agar work, and contamination-free cultivation from start to finish. Getting the mushroom lab setup steps right from the beginning separates growers who achieve consistent harvests from those who battle contamination batch after batch. A well-planned lab does not require a professional facility or a large budget. A basic setup using a still air box costs under £260, while a full DIY laminar flow hood configuration runs around £490. Whether you are cultivating oyster, shiitake, or lion’s mane, the principles of sterile technique and environmental control remain the same.
What are the essential tools for a mushroom lab setup?
The equipment you need depends on your budget and the complexity of your cultivation goals. Every functional mushroom cultivation lab setup, however, shares a core set of tools regardless of scale.
| Tool | Approximate cost | Function |
|---|---|---|
| Still air box (SAB) | £10–£15 | Low-cost sterile work area for inoculations |
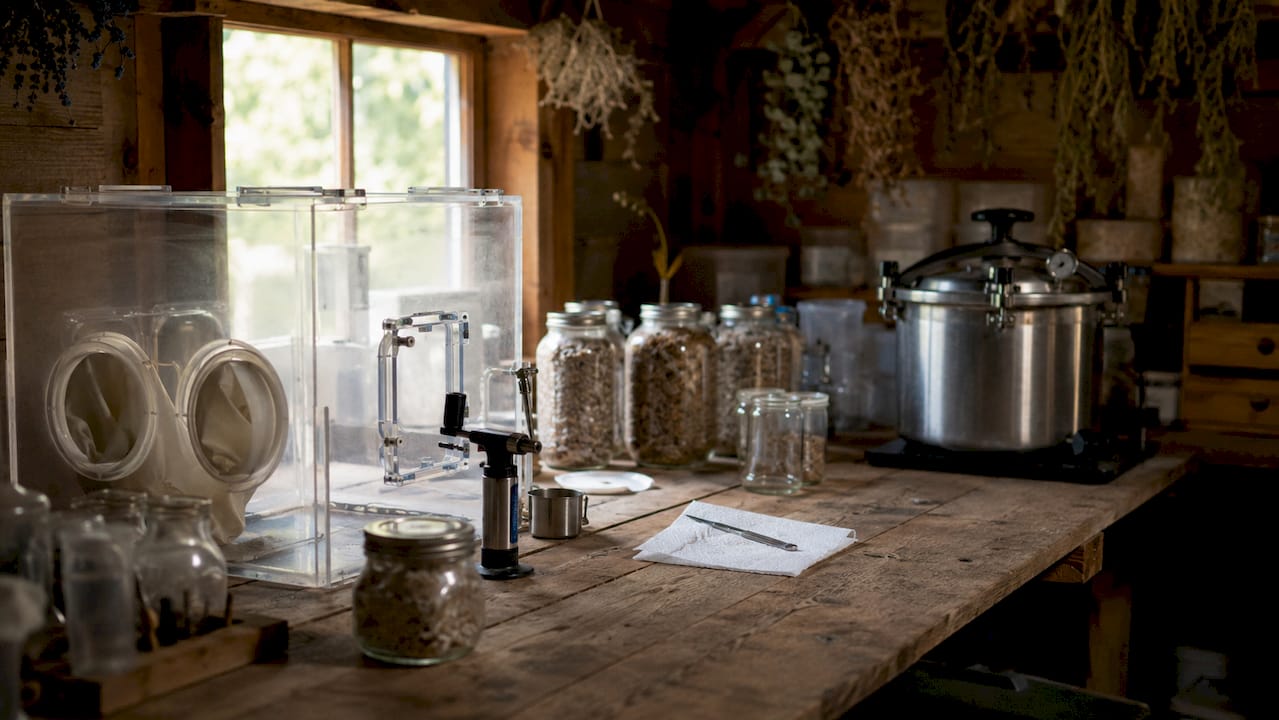
| Pressure cooker (e.g., Presto 23-quart) | £70–£90 | Sterilises grain and substrate at 15 PSI |
| Laminar flow hood (DIY) | £200–£250 | HEPA-filtered sterile air for advanced work |
| Scalpel and blades | £5–£10 | Agar transfers and mycelium isolation |
| Alcohol lamp or butane torch | £8–£15 | Flame sterilisation of metal tools |
| Digital hygrometer/thermometer | £10–£20 | Monitoring temperature and humidity |
| Agar plates and petri dishes | £15–£25 | Pure culture isolation and cloning |
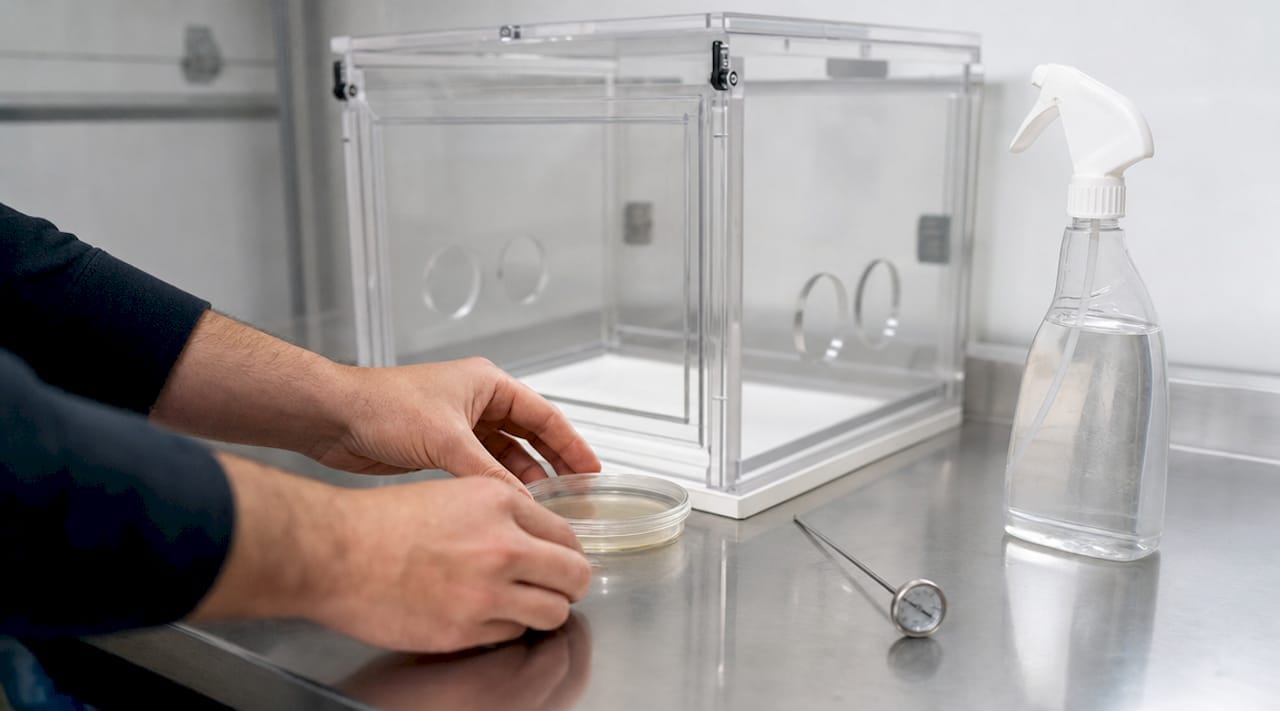
A basic SAB setup is the right starting point for most beginners. It keeps costs low while teaching you the fundamentals of sterile work before you invest in more advanced equipment.
Pro Tip: Upgrading to a laminar flow hood with a HEPA filter pushes contamination success rates from roughly 90% with a still air box to over 99%. That difference becomes significant once you are running multiple batches simultaneously.
Sharp, sterile cutting tools matter more than most beginners expect. A dull scalpel drags and tears agar rather than cutting cleanly, which increases the risk of introducing contaminants during transfers. Replace blades frequently and always flame-sterilise between cuts.
How to prepare and sterilise your mushroom lab environment
Creating a sterile workspace is the single most critical stage in the mushroom laboratory setup guide. Without it, every subsequent step is compromised before it begins.
Follow these steps to prepare your lab environment correctly:
- Choose the right room. Select a space with smooth, waterproof walls and floors that include drainage. Rough surfaces harbour mould spores and bacteria that no amount of cleaning will fully eliminate.
- Clear and clean the space. Remove all unnecessary items. Wipe every surface with isopropyl alcohol (70% concentration is more effective than 99% for killing microbes) before each work session.
- Set up your sterile work area. Position your still air box or laminar flow hood away from doors, windows, and air vents. Drafts are the primary enemy of sterile work.
- Sterilise your tools. Flame-sterilise scalpels and inoculation loops with an alcohol lamp or butane torch until the metal glows red. Allow them to cool for 10–15 seconds before contact with agar or substrate.
- Practise personal hygiene. Wear nitrile gloves, a face mask, and a clean lab coat or dedicated clothing. Hair and skin shed particles constantly, and each one is a potential contamination source.
- Sterilise your substrate. Use a pressure cooker rated explicitly for 15 PSI sterilisation. Many stovetop models fail to hold this pressure consistently, leaving resistant bacterial endospores alive in your substrate. Those endospores will ruin entire batches weeks later when you least expect it.
“Lab design focusing on material choice and smooth surfaces greatly reduces contamination risks over expensive technology alone.” This means your room’s physical construction is as important as the equipment inside it.
Pro Tip: Spray the interior of your still air box or laminar flow hood with 70% isopropyl alcohol and allow it to settle for two minutes before beginning any work. This drops the airborne particle count significantly before you open a single container.
Ventilation requires careful thought. You need enough air movement to prevent CO₂ build-up, but not so much that you introduce unfiltered outside air. HEPA-filtered intake fans solve this problem cleanly.
What are the key steps in producing mushroom spawn in a lab?
Spawn production is the heart of any working mushroom cultivation lab. This is where your pure mycelium cultures are transferred onto a nutritious grain substrate, colonise it fully, and become the living material you use to inoculate your fruiting blocks.
Here is the process in sequence:
- Isolate a pure culture on agar. Start with a spore syringe, spore print, or tissue clone placed onto an agar plate. Agar work allows you to see growth patterns clearly and spot contamination early before it spreads to your grain jars.
- Prepare your grain substrate. Rye berries, wheat berries, and popcorn are all common choices. Soak the grain for 12–24 hours, simmer until just tender, drain thoroughly, and allow the surface to dry before loading into jars.
- Sterilise the grain jars. Pressure cook at 15 PSI for 90–120 minutes. Allow jars to cool completely, ideally overnight, before inoculation.
- Inoculate inside your sterile environment. Transfer an agar wedge or liquid culture into each jar using a sterile scalpel or syringe. Work quickly and deliberately inside your still air box or laminar flow hood.
- Incubate at the correct temperature. Most species colonise well between 21°C and 27°C. Grain spawn typically colonises fully within 10 to 21 days, depending on species and strain.
- Assess colonisation and spawn readiness. Fully colonised grain appears uniformly white and dense with visible mycelial threads binding the grains together. Any green, black, or pink patches indicate contamination.
Common issues to watch for during spawn production:
- Wet grain: Excess moisture causes bacterial contamination that smells sour. Dry grain surfaces thoroughly before sterilising.
- Slow colonisation: Usually caused by temperatures that are too low or grain that was over-cooked and lacks nutrition.
- Green mould (Trichoderma): The most common contaminant in grain jars. Discard affected jars immediately and review your sterilisation and inoculation technique. Sporebuddies has a detailed guide on managing contamination that covers identification and prevention.
| Spawn issue | Likely cause | Solution |
|---|---|---|
| Green or black patches | Trichoderma or Aspergillus contamination | Discard jar, review sterilisation pressure |
| Sour smell | Bacterial wet rot | Dry grain more thoroughly before sterilising |
| No growth after 7 days | Low temperature or dead culture | Raise temperature, verify culture viability |
| Slow, patchy growth | Uneven inoculation or poor agar transfer | Use multiple inoculation points per jar |
How to control environmental factors for healthy mycelium growth
Environmental control is what separates a productive mushroom lab from one that produces inconsistent results. Temperature, humidity, ventilation, and light each play a distinct role at different stages of the cultivation cycle.
Key targets by growth stage:
- Colonisation humidity: Maintain 90–95% relative humidity. At this stage, mycelium is building mass and needs a stable, moist environment without fruiting triggers.
- Fruiting humidity: 85–95% relative humidity supports pin formation and mushroom development. Drops below 80% cause cracked caps and stunted growth.
- Ventilation rate: Exhaust fans should perform 3 to 5 air exchanges per hour. This prevents CO₂ accumulation, which inhibits fruiting in most species.
- Temperature by species: Oyster mushrooms fruit well between 15°C and 21°C. Shiitake prefers 13°C to 18°C for fruiting. Lion’s mane fruits best between 18°C and 24°C. Colonisation temperatures are generally 3°C to 5°C warmer than fruiting temperatures for each species.
- Lighting: Mushrooms do not photosynthesise, but light acts as a directional cue for fruiting bodies. LED strips providing 12 hours of indirect light per day are sufficient. Avoid direct UV exposure, which degrades mycelium over time.
- Flooring and shelving: Use stainless steel or HDPE plastic shelving. Both materials resist moisture and can be wiped down with disinfectant without degrading. Waterproof flooring with drainage prevents water pooling, which creates mould-prone conditions at high humidity levels.
Pro Tip: Use a digital hygrometer and thermometer with an external probe rather than a basic wall-mounted unit. External probes let you measure conditions at the substrate level, where your mycelium actually lives, rather than at head height where readings are less relevant.
Choosing the right mushroom substrate for each species also affects how well your environmental controls work. Dense hardwood blocks hold moisture differently from straw or coco coir, so your humidity management strategy needs to match your substrate choice.
Key takeaways
A successful mushroom lab setup requires sterile technique, correct pressure sterilisation, and precise environmental control working together at every stage.
| Point | Details |
|---|---|
| Start with the right workspace | Smooth, waterproof surfaces and drainage are foundational before any equipment is added. |
| Sterilise at 15 PSI consistently | Pressure cookers must hold 15 PSI to kill resistant endospores and protect your substrate. |
| Upgrade to a laminar flow hood when ready | HEPA-filtered airflow raises contamination success rates from 90% to over 99%. |
| Isolate pure cultures on agar first | Agar plates reveal contamination early and protect your grain spawn from the start. |
| Match environmental targets to growth stage | Colonisation and fruiting require different humidity, temperature, and ventilation settings. |
Get the right equipment from Sporebuddies
Building your mushroom lab becomes much easier when you have reliable equipment from the start. Sporebuddies stocks a full range of mushroom growing equipment suited to every stage of lab setup, from pressure cookers and agar supplies to sterilised substrates ready for inoculation. If you are working out which substrate works best for your chosen species, the bulk substrate range covers options for oyster, shiitake, lion’s mane, and more. Whether you are setting up your first still air box or upgrading to a full laminar flow system, Sporebuddies has the supplies to support your next step.
FAQ
What does a basic mushroom lab setup cost?
A basic mushroom lab using a still air box and pressure cooker can be set up for under £260. A full DIY laminar flow hood setup costs approximately £490 to £500.
What pressure is needed to sterilise mushroom substrate?
Substrate must be sterilised at a consistent 15 PSI to kill resistant bacterial endospores. Many standard stovetop pressure cookers fail to hold this pressure reliably, so choose a model rated explicitly for 15 PSI.
How long does grain spawn take to colonise?
Grain spawn typically colonises fully within 10 to 21 days under sterile incubation conditions. The exact duration depends on the mushroom species, strain vigour, and incubation temperature.
Do I need a laminar flow hood to grow mushrooms?
A laminar flow hood is not required for beginners, but it raises contamination success rates from around 90% with a still air box to over 99%. It becomes worthwhile once you are running multiple batches or working with sensitive cultures.
What humidity level do mushrooms need during fruiting?
Most mushroom species require 85 to 95% relative humidity during the fruiting stage. Ventilation fans should perform 3 to 5 air exchanges per hour to prevent CO₂ build-up while maintaining that humidity range.