Growing mushrooms at home in the UK is genuinely rewarding, but even careful cultivators can lose entire batches to contamination, poor environmental conditions, or a single missed step. The margin between a thriving flush and a failed block can be surprisingly thin. Whether you are producing oyster mushrooms for your kitchen or studying spores for research purposes, understanding how to actively manage each stage of the grow cycle makes the real difference. This guide walks you through everything: the right tools, a stage-by-stage action plan, contamination response, and the legal landscape every UK grower needs to know.
Table of Contents
- What you need for effective grow cycle management
- Step-by-step: managing each stage of the mushroom grow cycle
- Preventing and responding to contamination
- Understanding the legal limitations for UK growers
- Why personal data and ruthless hygiene matter most
- Find trusted UK supplies and guidance for every grow cycle
- Frequently asked questions
Key Takeaways
| Point | Details |
|---|---|
| Contamination is the top threat | Once visible, contamination has already spread and usually means the batch is lost. |
| Hygiene and logging are vital | Careful cleanliness and record-keeping allow home growers to limit mistakes and learn quickly. |
| Stay legal in the UK | Culinary varieties are legal to cultivate, but psilocybin-containing mushrooms are not. |
| Right tools improve cycles | Using proper tools and supplies streamlines every stage from inoculation to harvest. |
What you need for effective grow cycle management
Having set the urgency, it is key to break down precisely what materials and setup you need for repeatable success. Starting with the right kit is not just about convenience. It directly determines whether you produce healthy fruit bodies or spend weeks cleaning up green mould.
Essential tools and materials
Here is what you will need before you inoculate your first substrate:
- Spore syringes or spore prints from reputable UK sources (always confirm legality for the species you are working with, covered below)
- Sterilised substrate such as grain jars, straw, or sawdust blocks, depending on your target species
- Sterilised containers including mason jars, grow bags, or monotubs
- Still air box or laminar flow hood to create a low-contamination inoculation environment
- Nitrile gloves, face mask, and isopropyl alcohol (70%) for surface and hand hygiene
- A digital thermometer and hygrometer to track temperature and humidity
- A notebook or spreadsheet for cycle logging
Beginners often underestimate the value of exploring the range of UK spore types before committing to a species. Different strains have different colonisation temperatures, humidity needs, and fruiting triggers. Knowing these upfront lets you match your growing environment rather than fight it.
Environmental conditions that matter
| Parameter | Colonisation | Fruiting |
|---|---|---|
| Temperature (°C) | 24 to 28 | 18 to 24 |
| Relative humidity (%) | 85 to 95 | 90 to 95 |
| Fresh air exchange | Minimal | High |
| Light | Not required | 12 hours indirect |
| CO₂ tolerance | High | Low |
The UK climate adds its own layer of complexity. Cool, damp winters can lower colonisation temperatures below the optimal range without supplemental heating. Conversely, warm summers may push fruiting blocks past their comfortable fruiting threshold. Budget for a small heat mat and a fan-controlled martha tent or fruiting chamber from the outset.
Why logging is non-negotiable
Tracking every cycle creates a feedback loop that compounds your skills over time. When you log inoculation date, temperature readings, first signs of colonisation, and final harvest weight, you can spot patterns. Was contamination more common in summer? Did a particular strain stall below 22°C? These insights only emerge from records.
Mycologyathome advises that by the time contamination is visible, it is already deep in your substrate. That means your contamination log should include where it appeared in the cycle, not just that it occurred. Distinguishing failures at inoculation versus colonisation versus fruiting tells you whether your sterilisation, your technique, or your fruiting conditions need attention. This targeted feedback loop is far more useful than a vague note that says “failed batch.”
Pro Tip: Before you start your first inoculation, wipe down every surface in your workspace with 70% isopropyl alcohol, leave a still air box undisturbed for fifteen minutes, and only then begin working. Contamination introduced at inoculation is the most common cause of total batch loss.
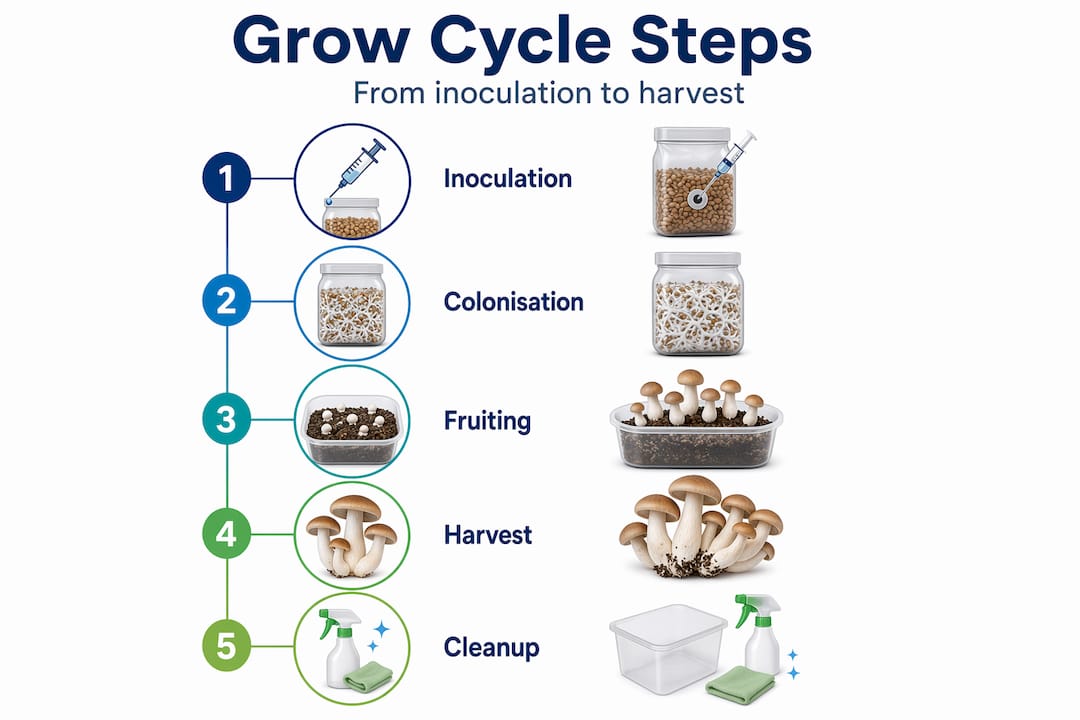
Step-by-step: managing each stage of the mushroom grow cycle
With your tools and mindset ready, here is how to actively manage every stage from start to finish.
1. Inoculation
- Sterilise your substrate (typically 15 PSI for 90 minutes for grain jars).
- Allow jars to cool completely to room temperature before inoculation.
- Wipe the injection port or self-healing port with 70% isopropyl alcohol.
- Flame-sterilise your needle and allow it to cool for five seconds before injecting.
- Inject 1 to 2 ml of spore solution per jar, aiming at the glass wall to distribute evenly.
- Seal the port and label each jar with the strain name, spore source, and date.
2. Colonisation
- Store inoculated jars in a dark location at 24 to 28°C.
- Check visually every two to three days without opening.
- Log the first signs of white mycelial growth and the percentage colonised each week.
- Watch for any colour changes: yellow, green, orange, or black indicates a problem.
- Wait until 100% colonisation before proceeding to fruiting initiation.
3. Fruiting initiation
- Lower temperature to the fruiting range appropriate for your species.
- Introduce fresh air exchange by fanning twice daily or using an automated FAE (fresh air exchange) system.
- Maintain surface moisture by misting lightly once or twice daily without waterlogging.
- Expose the block to indirect light for around twelve hours per day.
4. Harvesting
- Harvest just before or as the veil beneath the cap tears. This gives best flavour and potency.
- Twist and pull gently rather than cutting, to avoid leaving tissue that can rot.
- Remove all aborted pins and dead tissue after each flush.
- Rehydrate your block (dunking in cold water for four to twelve hours) between flushes.
- Log your harvest weight and flush number every time.
| Stage | Right action | Wrong action |
|---|---|---|
| Inoculation | Use a still air box, flame sterilise needle | Work in open room, skip alcohol wipe |
| Colonisation | Monitor without opening, log progress | Open jars to check, skip logging |
| Fruiting | Mist lightly, fan regularly | Overwater, ignore CO₂ build-up |
| Harvesting | Twist and pull before veil tears | Cut and leave stumps, skip clean-up |
| Contamination spotted | Bag and discard immediately | Cut out the patch, keep growing |
The decision to discard is the hardest one new growers face. But contamination spread risk means that cutting out patches during colonisation does not resolve the problem. The mycelium below already carries the contamination. Disposal is the correct call. The only partial exception is during active fruiting, where some experienced growers harvest any unaffected fruit bodies immediately before discarding the block. Refer to our step-by-step home cultivation guide for more detail on each stage.
Pro Tip: Keep a physical log sheet taped to each grow bag or jar. Seeing the record in front of you during checks makes it far easier to notice when something shifts compared to the previous observation.
Preventing and responding to contamination
Each stage brings possible setbacks. Here is how to stay one step ahead of contamination and act fast if it strikes.
Recognising contamination early
- Green, blue-green, or black patches typically indicate trichoderma or aspergillus moulds, both of which outcompete mushroom mycelium rapidly.
- Yellow or orange liquid pooling in a jar (known as metabolite secretion) can be a stress response or early bacterial contamination.
- Sour, sharp, or unpleasant odours from a jar or bag that should smell earthy signal bacterial growth.
- Patchy, cobwebby, or discoloured mycelium that looks watery or flat rather than thick and white is a warning sign.
- Wet rot presenting as a dark, slimy area on the substrate is a late-stage contamination that requires immediate removal.
Why late detection means full loss
“By the time contamination is visible, it is already deep in your substrate, and cutting out or salvaging is generally not effective. Disposal is the right call during colonisation, with an exception during fruiting where some growers harvest immediately for partial yield.” — Mycologyathome
This is one of the most important lessons in home cultivation, and it is counterintuitive. You see a small green patch and your instinct says remove it. But moulds like trichoderma reproduce via spores that have been circulating invisibly through the substrate for days before a visible patch appears. The visible patch is the symptom, not the start.
Trichoderma: a special warning
Trichoderma is the most aggressive and common contaminant in mushroom cultivation. Its spores are extremely light and travel through air with ease. Mycologyathome notes that you should seal the bag with tape before moving it and never open a contaminated bag indoors. Open it outside only if necessary, ideally into a bin bag. Even a brief indoor opening can release millions of spores into your growing environment and contaminate everything nearby.
Proper disposal protocol
- Do not open the bag or jar indoors.
- Seal with tape or place in a sealed plastic bag immediately.
- Remove from your growing space at once.
- Dispose of in an outdoor bin, not your compost heap.
- Wipe down any surface the contaminated container touched with 70% isopropyl alcohol.
- Wash your hands thoroughly before returning to any other grow work.
For additional troubleshooting support, our contamination troubleshooting guide and grow kit FAQ cover the most common contamination scenarios with photos and solutions.
Understanding the legal limitations for UK growers
With practical management covered, it is crucial to grasp legal lines so your hobby does not become a liability.
The clear legal picture for UK cultivators
- Culinary species such as oyster, shiitake, and lion’s mane are fully legal to cultivate at home. There are no restrictions on purchasing spores, substrates, or equipment for these varieties.
- Psilocybin mushrooms, including Golden Teacher, B+, and Penis Envy, are Class A controlled substances in the UK. Cultivating them is illegal regardless of intent.
- Spores themselves do not contain psilocybin and are not currently scheduled as controlled substances in the UK. This means purchasing spores for microscopy and research is legal. The moment spores are germinated into mycelium, however, the process crosses into illegal cultivation.
- Spore prints and spore syringes are sold legally for microscopy and research purposes only. This is the legal basis on which reputable UK suppliers operate.
What this means in practice
If you are a culinary grower, you have no legal concerns whatsoever. Your focus can remain entirely on technique and yield. If you are a mycology enthusiast studying spore morphology under a microscope, purchasing legal spores from a reputable UK source is straightforward and legitimate. You must not germinate psilocybin spores with intent to cultivate, and you must not cultivate the resulting mycelium or fruit bodies.
Understanding the difference is important. The legal framework in the UK distinguishes between possession of spores (legal for research) and the act of cultivation (illegal for psilocybin species). Treat this line with care.
For a thorough breakdown of what you can and cannot do, read our guides on legal UK cultivation basics, the legal mushroom species you can grow at home, magic mushroom legality in the UK, and buying legal spores in the UK.
The UK home cultivation community is growing steadily, with most participants focused on culinary varieties. Interest in edible species like oyster and lion’s mane has increased sharply as awareness of their culinary and potential mushroom health essentials continues to spread.
Why personal data and ruthless hygiene matter most
Most growers who struggle with repeated failures have one thing in common: they rely on intuition rather than records, and they treat hygiene as optional rather than essential. We have seen this pattern consistently, and it is worth being direct about it.
Equipment matters far less than behaviour. You can have the most expensive flow hood, premium grain jars, and top-tier spore syringes, yet still contaminate batch after batch if your technique is inconsistent or your workspace is not properly prepared. Conversely, a grower using a basic still air box made from a plastic tote, combined with meticulous logging and strict hygiene, will often outperform someone with far superior equipment.
The reason record-keeping is so powerful is simple: it converts vague impressions into actionable patterns. If you contaminate three batches in a row and you have no logs, you are guessing what went wrong. If you have logs showing that all three contaminations appeared during colonisation and all three jars were inoculated on a humid day without climate control in your workspace, you have a clear lead to follow.
The same applies to contamination response. Growers who hesitate to discard affected grows because they have put weeks of effort in almost always make the situation worse. The contamination spread evidence is unambiguous: delay costs you more than the batch you are trying to save. It costs you the surrounding environment, your next jars, and your confidence.
Ruthless hygiene and honest record-keeping are not glamorous skills. They do not make for exciting content. But they are the single biggest factor separating home growers who build real skill from those who plateau at inconsistent results. Choose the former.
Find trusted UK supplies and guidance for every grow cycle
If you are ready to put this guide into practice, having reliable UK-sourced materials behind you will make every stage smoother. At Spore Buddies, we stock a wide range of spore syringes for microscopy and research, along with everything you need to set up a productive home cultivation space. Whether you are just starting out with beginner-friendly grow kits for culinary species or scaling up your setup with wholesale mycology supplies, you will find legal, high-quality options alongside the educational support to use them well. Browse our catalogue and take the next step in your growing journey with confidence.
Frequently asked questions
What is the biggest cause of failure in UK home mushroom growing?
Contamination is the primary reason crops fail, because it spreads quickly and is already deep in the substrate by the time you can see it, making recovery difficult.
Can I legally grow magic mushrooms at home in the UK?
Growing psilocybin mushrooms is illegal in the UK. The legal status means only purchasing spores for microscopy or research is permitted, not germinating or cultivating them.
Is it ever safe to cut out contaminated sections of a mushroom grow?
It is almost never safe to cut out patches, because contamination is already microscopically spread well before the visible patch appears. Discarding the whole grow is the safer and more effective response.
How can I minimise contamination risk during colonisation?
Never open colonising bags indoors. If you must remove a contaminated bag, seal it with tape first, then handle it outside, as trichoderma spores travel rapidly through indoor air and can infect your entire growing space.