Growing mushrooms at home sits in a surprisingly grey area for many UK growers. On one hand, psilocybin mushrooms are illegal to cultivate under the Misuse of Drugs Act 1971, classed as a Schedule A controlled substance. On the other hand, edible and research mushrooms such as oyster, shiitake, and lion’s mane are perfectly legal, brilliantly rewarding, and far simpler to grow than most people assume. If you’ve been unsure where the legal lines fall or how to build a reliable growing workflow from start to finish, this guide covers everything you need, from legality and tools through to harvest and troubleshooting.
Table of Contents
- Understanding legality and mushroom types in the UK
- What you need: Tools, materials and preparation
- Workflow step-by-step: From inoculation to harvest
- Common mistakes and troubleshooting legal cultivation
- A practical perspective: Why workflow matters more than hype
- Get started with tools and kits for legal mushroom cultivation
- Frequently asked questions
Key Takeaways
| Point | Details |
|---|---|
| Legal boundaries | Only edible and non-psilocybin mushrooms can be cultivated in the UK without a licence. |
| Workflow discipline | Following step-by-step sterile workflow significantly increases your yields and reduces failure. |
| Best beginner species | Oyster mushrooms are most reliable for UK newcomers, with forgiving conditions and strong yields. |
| Ecological compliance | Choose native strains outdoors and dispose substrate responsibly to avoid legal and environmental issues. |
| Scaling up | Semi-professional setups need controlled environments and consistent sterility for large harvests. |
Understanding legality and mushroom types in the UK
Knowing exactly which mushrooms you can and cannot grow is the essential first step. The rules are clearer than you might expect, but the consequences of getting it wrong are serious, so it’s worth reviewing this carefully.
Edible and gourmet mushrooms such as oyster (Pleurotus ostreatus), shiitake (Lentinula edodes), and lion’s mane (Hericium erinaceus) are fully legal for personal cultivation in the UK. There are no specific licences required, no registration needed, and no legal barriers for amateur home growers or semi-professional cultivators producing for personal use.
Magic mushrooms containing psilocybin are a different matter entirely. Cultivating them is illegal regardless of intent. Spores, however, occupy a specific niche: they are legal to purchase and hold for microscopy and research purposes only. The moment those spores germinate into mycelium, the grow crosses into illegal territory. Understanding UK mushroom spore legality before you purchase is critical.
For mycology research, the picture is slightly more nuanced. Microscopy and study of non-psilocybin species carries no restrictions. If you’re working with psilocybin-containing species in a scientific context, a Home Office licence is required and is rarely granted outside formal research institutions.
Legal boundaries by mushroom type
| Mushroom type | Legal to cultivate? | Licence required? | Spores permitted? |
|---|---|---|---|
| Oyster mushrooms | Yes | No | Yes |
| Shiitake | Yes | No | Yes |
| Lion’s mane | Yes (indoors only) | No | Yes |
| Psilocybin species | No | Home Office only | For microscopy only |
| Native edible wild species | Yes (with care) | No | Yes |
Key restrictions to keep in mind:
- Do not cultivate psilocybin-containing mushrooms under any circumstances without a Home Office licence
- Avoid releasing non-native invasive species outdoors, including golden oyster mushroom (Pleurotus citrinopileinus)
- Wild lion’s mane is a protected species in the UK; grow cultivated, non-native strains indoors only
- Dispose of spent substrate responsibly to prevent unintended ecological spread
Important: Even holding live psilocybin mycelium is considered production under UK law and is treated as a Class A drug offence. Spores are only legal before germination and for microscopy purposes. Always check mushroom safety guides if you are unsure about a species before you begin.
What you need: Tools, materials and preparation
With legality clarified, your next step is assembling the right tools, materials, and preparing for a safe and legal grow. Whether you are a complete beginner starting with a ready-made kit or a semi-professional building your own substrate and spawn operation, getting your setup right at this stage saves significant time and money later.
Essential tools and materials
| Tool or material | Beginner level | Semi-professional level |
|---|---|---|
| Grow kit (pre-inoculated) | Highly recommended | Optional |
| Pressure cooker (15 PSI) | Helpful | Essential |
| Sterile syringes or agar plates | Optional | Essential |
| Grain jars or grow bags | Optional | Essential |
| Humidity gauge (hygrometer) | Recommended | Essential |
| Still air box or flow hood | Optional | Essential |
| Thermometer | Recommended | Essential |
| Isopropyl alcohol (70%) | Recommended | Essential |
The standard workflow for any legal cultivation operation begins with obtaining your spawn or kit, then preparing or pasteurising a suitable substrate. Common substrates include straw, sawdust, coffee grounds, or wood chips depending on the species.
Best substrates by mushroom type:
- Oyster mushrooms: Straw, pasteurised to 70°C for one hour; also performs well on coffee grounds and cardboard
- Shiitake: Hardwood sawdust supplemented with wheat bran; benefits from a longer colonisation period
- Lion’s mane: Hardwood sawdust with a lower supplement ratio to reduce contamination risk
- King oyster (Pleurotus eryngii): A mix of sawdust and straw works well; tolerates slightly cooler temperatures
The question of kits versus DIY is one growers often ask about. Kits are the easiest entry point for amateurs, requiring minimal equipment and delivering reliable results on your first grow. DIY spawn and substrate production scales far better for semi-professionals but demands strict sterility protocols. You can explore the full range of options through mushroom growing kits info to match the right approach to your ambitions.
On the ecological side, the Royal Horticultural Society recommends using native UK strains when growing outdoors to prevent the spread of invasive species. Golden oyster mushrooms, despite being popular globally, should not be cultivated outdoors in UK conditions due to their invasive potential.
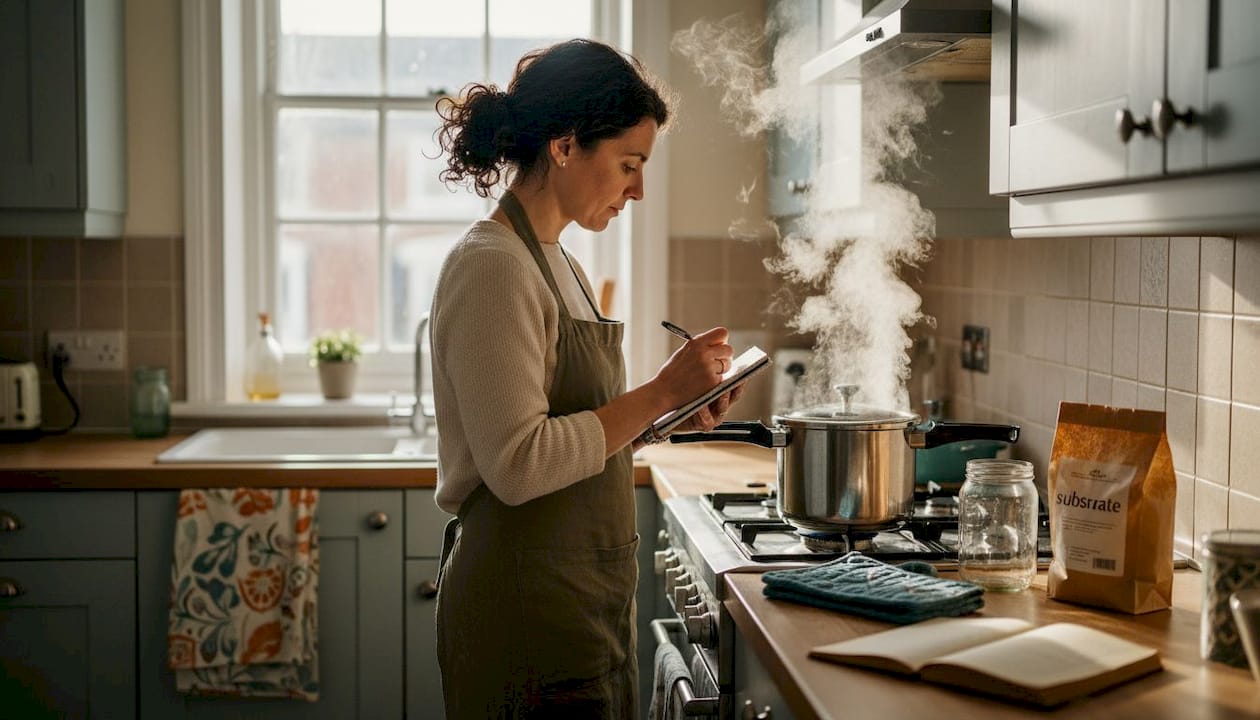
Pro Tip: If you plan to scale beyond a single kit, invest in a pressure cooker rated to 15 PSI before anything else. Sterilising grain or supplemented sawdust at 15 PSI for 90 minutes to 2.5 hours eliminates contamination risks that would otherwise destroy your entire batch. Sterility is not optional at scale; it is the single most important factor between consistent yields and constant failure.
Workflow step-by-step: From inoculation to harvest
Once you have your tools and materials ready, follow these clear workflow steps for reliable results. The process is logical and repeatable once you understand the reasoning behind each stage.
1. Prepare and sterilise your substrate. For grain spawn, sterilise at 15 PSI for 90 minutes to 2.5 hours depending on volume. For straw, hot water pasteurisation at 70 to 80°C for one hour is sufficient. Allow the substrate to cool completely before inoculation.
2. Inoculate in sterile conditions. Use a still air box or laminar flow hood to introduce your spawn or spore syringe to the cooled substrate. Work quickly, wipe all surfaces with isopropyl alcohol, and minimise the time the substrate is exposed to open air. A typical inoculation ratio is 1 part spawn to 10 parts substrate.
3. Incubate until fully colonised. Place your inoculated jars or bags in a dark space at 20 to 24°C with relative humidity between 40 and 60%. Most species will show visible mycelium within 5 to 10 days and reach full colonisation within 10 to 21 days. Shake grain jars once midway through to distribute mycelium evenly and speed up colonisation.
4. Initiate fruiting conditions. Once your substrate is fully colonised (appearing white throughout with no green, black, or pink patches), move it to fruiting conditions. This means lower temperatures of 12 to 22°C depending on species, high humidity between 85 and 95%, fresh air exchange, and indirect light for 12 hours per day.
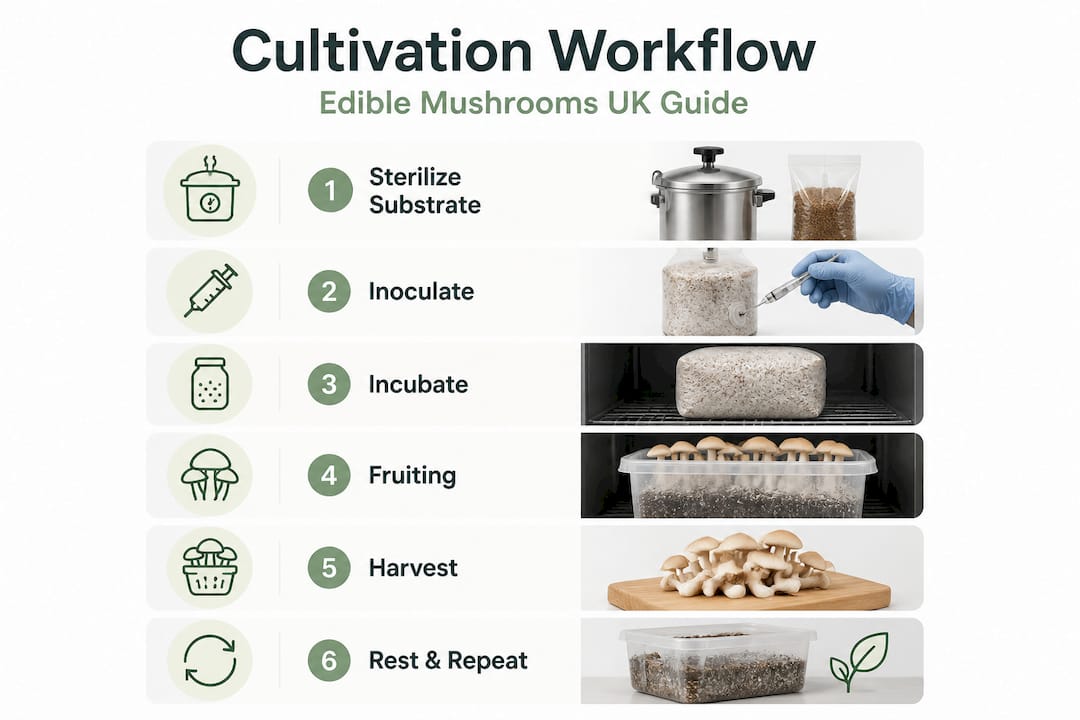
5. Harvest at the right time. Harvest before the caps fully flatten and before the veil underneath breaks, if present. For oyster mushrooms, this means picking when the caps are still slightly curled inwards. Harvesting too late reduces yield quality and spore release can trigger allergic reactions in some growers.
6. Rest and repeat for multiple flushes. After harvesting, allow your substrate to rest for 5 to 7 days with reduced humidity, then return to fruiting conditions. Most blocks will produce two to four productive flushes before the substrate is exhausted.
Workflow comparison by species
| Factor | Oyster mushrooms | Lion’s mane | Shiitake |
|---|---|---|---|
| Colonisation time | 2 to 3 weeks | 2 to 4 weeks | 4 to 8 weeks |
| Fruiting temperature | 15 to 20°C | 18 to 22°C | 12 to 18°C |
| Humidity required | 85 to 95% | 85 to 95% | 80 to 90% |
| Typical yield (3kg block) | 0.7 to 1kg | 0.5 to 0.8kg | 0.5 to 1kg |
| Flushes expected | 2 to 4 | 2 to 3 | 3 to 5 |
| Difficulty level | Beginner | Intermediate | Intermediate |
Oyster mushrooms are the fastest option for newcomers, colonising straw in two to three weeks and yielding 0.7 to 1kg per 3kg block over two flushes at temperatures between 15 and 20°C. Research confirms that on optimised substrates, full colonisation takes just 16 days with first harvest possible at day 27 and a first flush yield of around 51g per bag.
For lion’s mane, read the detailed breakdown in the guide to growing lion’s mane at home for species-specific tips on humidity and fruiting triggers. A thorough mushroom cultivation step-by-step walkthrough is also available if you want to go deeper into the individual stages.
Pro Tip: To maximise your second and third flushes, soak your exhausted substrate block in cold water for 8 to 12 hours before returning it to fruiting conditions. This technique, known as cold shocking, rehydrates the substrate and signals to the mycelium that conditions are right for another fruiting cycle.
Common mistakes and troubleshooting legal cultivation
With the workflow mapped, awareness of common mistakes and troubleshooting is the key to consistently productive, legal cultivation. Even experienced growers encounter setbacks, but most failures follow predictable patterns that you can learn to avoid.
The most common mistakes made by amateurs and semi-pros:
- Inoculating substrate that has not cooled fully, which kills the mycelium on contact
- Skipping sterilisation and relying on pasteurisation alone for supplemented substrates
- Opening fruiting chambers too frequently, disrupting humidity and fresh air balance
- Harvesting too late, reducing quality and triggering heavy spore release
- Planting non-native strains outdoors, creating ecological and legal risk
- Using tap water with high chlorine content; allow it to sit overnight or use filtered water
- Neglecting temperature drops between colonisation and fruiting, which inhibits pinning
Species-specific challenges matter too. Oyster mushrooms are forgiving and tolerate fluctuations in humidity and temperature reasonably well. Lion’s mane and shiitake, however, demand more precise environmental conditions and are significantly more sensitive to contamination and temperature swings. If you’re seeing slow or absent pinning with lion’s mane, the most common culprit is insufficient fresh air exchange combined with high CO2 levels.
Ecological and legal compliance warning: Do not cultivate golden oyster mushrooms (Pleurotus citrinopileinus) outdoors in the UK. This species is considered potentially invasive in temperate climates. Wild lion’s mane is a protected species; only cultivated, non-native strains grown indoors are permissible. Dispose of all spent substrate in sealed bags before composting to prevent accidental spore dispersal.
The topic of mushroom health and safety is broader than most growers assume, and covers everything from contamination risk to responsible disposal practices. If you’re troubleshooting persistent contamination or repeated cultivation failures, the legal cultivation troubleshooting guide provides structured advice for diagnosing and correcting the most common issues.
Pro Tip: Maintain a simple cultivation log for each batch, recording temperature, humidity, inoculation date, and any observations. Even three or four data points per batch will help you identify patterns in contamination or slow colonisation and improve your results significantly over time.
A practical perspective: Why workflow matters more than hype
Here is something that many beginners discover the hard way. The mushroom cultivation community, particularly online, generates a lot of enthusiasm around exotic species, high-tech setups, and promises of enormous yields. In reality, the growers who achieve the most consistent, rewarding results are not the ones with the fanciest equipment. They are the ones who follow a disciplined, repeatable workflow every single time.
Contamination is not bad luck. It is almost always the result of a skipped step, a rushed inoculation, or a substrate that was not properly sterilised. We’ve seen this pattern repeatedly, and the data backs it up: the mycology cultivation process rewards methodical growers over impulsive ones, every time.
There is also an element of ecological mindfulness that rarely gets the attention it deserves. Legal compliance is not just about avoiding psilocybin species. It includes being genuinely thoughtful about which strains you grow outdoors, how you dispose of spent substrate, and whether your practices could unintentionally affect local ecosystems. This is particularly relevant as outdoor mushroom cultivation grows in popularity across the UK.
The long-term benefit of learning proper workflow is repeatability. A grower who understands why each step exists can adapt when something goes wrong, troubleshoot contamination with confidence, and improve yields flush after flush. That understanding is worth far more than any kit or shortcut.
Get started with tools and kits for legal mushroom cultivation
Having walked through workflow and pitfalls, the natural next step is sourcing high-quality, legal supplies suited to your level. At Spore Buddies, we stock everything UK growers need, from beginner-friendly complete grow kits for oyster, shiitake, and lion’s mane through to professional-grade spore syringes, sterilised grain jars, agar plates, and microscopy equipment. Whether you are ready to try your first oyster mushroom grow kit or you want to expand into making your own grain spawn, you’ll find reliable, UK-legal products alongside educational guides that reinforce every stage of the process covered in this article. Our team is passionate about supporting growers at every level, and our blog continues to add practical, evidence-based content to help you cultivate with confidence.
Frequently asked questions
Is it legal to cultivate magic mushrooms in the UK for personal use?
No, cultivating magic mushrooms containing psilocybin is illegal under UK law; spores are only legal to hold for microscopy and research purposes, not for germination or cultivation.
Do I need a licence to grow edible mushrooms like oyster or lion’s mane in the UK?
No licence is required for personal cultivation of legal edible mushrooms, provided you follow ecological guidelines and avoid releasing potentially invasive strains into the UK environment.
What’s the easiest mushroom for beginners to grow legally in the UK?
Oyster mushrooms are the most beginner-friendly option, offering fast colonisation in 2 to 3 weeks and yields of 0.7 to 1kg per 3kg block with a forgiving tolerance to minor environmental fluctuations.
How should I safely dispose of spent mushroom substrate?
Seal spent substrate in a bag before composting and avoid outdoor disposal of potentially invasive strains; follow RHS ecological guidance specifically for lion’s mane and non-native oyster varieties.
What is the main cause of failure in mushroom cultivation workflow?
Contamination is the leading cause of failure, particularly when scaling up or working with sensitive species like lion’s mane; maintaining strict sterility at every stage of inoculation is the most effective preventive measure.