
Quick Answer
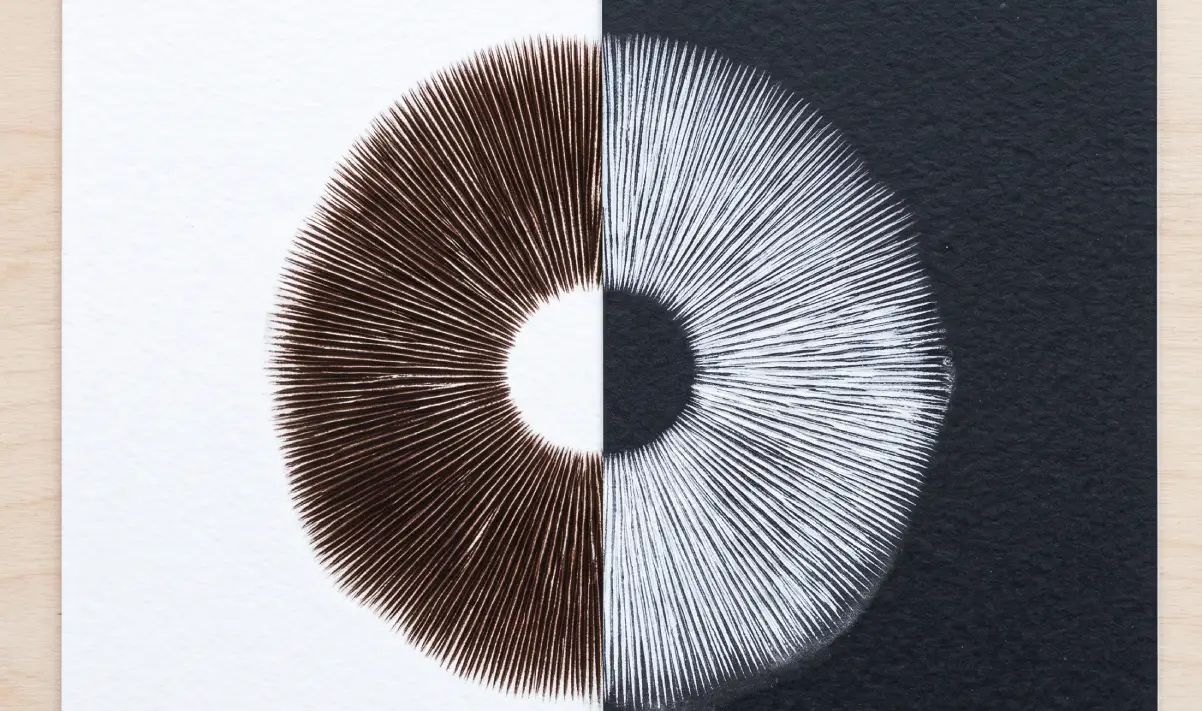
A spore print is made by placing a mushroom cap, gill-side or pore-side down, onto a clean surface such as foil, paper, or a glass slide, then leaving it undisturbed for several hours overnight so spores fall and settle into a visible deposit. The colour, density, and pattern of that deposit are one of the most useful characteristics for identifying a species and comparing it against reference material. It’s a simple technique that forms the basis of a lot of hobbyist and research-level mycology work.
What Is a Spore Print?
A spore print is exactly what it sounds like: a powdery deposit left behind when a mature fruiting body releases spores onto a surface below it. Left long enough, that deposit builds into a visible pattern that mirrors the gill or pore structure of the cap above it.
It’s been used as an identification tool for well over a century. Spore colour remains one of the most reliable macroscopic characteristics available to mycologists, and detailed morphological features such as spore shape, size, and surface ornamentation continue to sit alongside colour as core identification criteria, even as newer techniques like DNA-based identification have developed alongside traditional methods.
For a hobbyist working at home, a spore print does two useful jobs at once. It gives you a colour reference to help narrow down identification, and it produces spore material that can be stored, studied under a microscope, or used to prepare a spore syringe later on.
Equipment You’ll Need
Taking a spore print doesn’t require anything specialist.
- A mature mushroom cap, ideally freshly picked or purchased, with fully developed gills or pores
- A clean surface to print onto, such as aluminium foil, dark and light paper (using both helps with pale or dark spore colours), or a glass slide if you’re planning to study it under a microscope afterwards
- A container to cover the setup, such as a glass or bowl, to reduce airflow and contamination while the print forms
- Tweezers or gloves, to handle the cap without introducing bacteria from your hands
- A sharp, clean blade, if you need to remove the stem before printing
None of this needs to be expensive or difficult to source, which is part of why spore printing has remained such an accessible starting point for anyone curious about fungal identification.
Step-by-Step: How to Take a Spore Print
- Choose a mature specimen. A cap that’s just beginning to open, with gills or pores fully visible, tends to give the strongest print. Overly young or old specimens often print poorly.
- Remove the stem. Cut the stem close to the cap so the gills or pores sit flat against your printing surface.
- Prepare a mixed surface. Lay down both a dark and a light piece of paper or foil side by side, so whichever colour the spores turn out to be, you’ll have contrast to see it clearly.
- Place the cap gill-side or pore-side down. Position it directly onto the printing surface, straddling the line between the dark and light sections if you’re using both.
- Cover loosely. Place a glass or bowl over the cap to reduce air movement and limit contamination, without sealing it completely.
- Leave undisturbed. Most prints develop within a few hours, though leaving it overnight often gives a denser, more usable deposit.
- Lift the cap carefully. Once you’re happy with the density of the print, lift the cap straight up rather than sliding it, to avoid smudging the pattern.
- Store or examine. If you’re studying the print under a microscope, do so while it’s fresh. If you’re storing it for later, fold the paper or foil around the print and keep it somewhere cool and dry.
Pro Tip: print onto glass rather than paper if you’re planning to examine the spores under a microscope shortly afterwards. It’s easier to transfer a small sample from glass onto a slide without disturbing the rest of the print.
Pro Tip: label every print immediately with the species (or your best identification attempt), date, and location if foraged. It’s easy to lose track of which print belongs to which specimen once you’ve built up a small collection.
Why This Matters
Spore colour and morphology genuinely matter beyond simple curiosity. Entire fungal families are distinguished largely by spore characteristics, and getting a clear, well-developed print is often the difference between a confident identification and an inconclusive one.
Morphological identification methods, including spore shape, size, and surface ornamentation, remain among the most widely used approaches in fungal identification precisely because they’re accessible without needing laboratory equipment or specialist training (PMC review of fungal identification methods). A spore print is often the first practical step toward that kind of morphological assessment, whether you’re comparing a foraged specimen against reference guides or documenting a strain for research purposes.
A single mushroom cap can release millions of spores over the course of forming a print, which is why even a partial or uneven print usually still provides enough material for colour assessment and further study.
Using Your Print for Microscopy
A spore print on its own gives you a colour reference, but most serious identification work goes a step further and examines the spores under magnification.
To do this, take a small pinch of spore material from your print using a clean scalpel tip or the edge of a slide, then mount it in a drop of water on a glass slide with a cover slip on top. Under a compound microscope at 400x or higher, you can assess spore shape, size, and surface texture, which together with colour gives a far more complete picture than colour alone.
This is also where a print differs usefully from a spore syringe. A syringe suspends spores ready-to-use in liquid, while a print gives you a dry, storable record you can return to and re-examine at any point, which makes it a good complement to syringe-based study rather than a replacement for it.
A Note on Legal Considerations
Spore prints themselves sit in broadly the same legal position as spores generally: they’re widely used for identification, research, and record-keeping without issue. What matters is what’s done with that material afterwards, since the legal status of cultivating certain species from spores varies and is the responsibility of the individual to understand before proceeding beyond identification and study.
This guide focuses specifically on the printing and identification process. If you’re unsure how a particular species is treated under current UK guidance, it’s worth checking before doing anything beyond taking and studying a print.
Common Mistakes
Using a specimen that’s too young. Immature caps with gills that haven’t fully opened often release too few spores for a usable print. Wait until the cap has opened properly.
Printing in a draughty spot. Air movement can scatter spores before they settle, leaving a faint or uneven print. Choose a still, undisturbed spot for the several hours the process takes.
Only using one paper colour. Without a contrasting background, pale spore deposits on white paper (or dark deposits on dark paper) can be almost invisible. Always use both a light and dark surface.
Sliding the cap when removing it. This smudges the print and can make the pattern harder to read. Lift straight up instead.
Skipping labelling. A print without a note of species, date, and source becomes far less useful once you’re working with more than one or two at a time.
Storing prints somewhere damp. Moisture can degrade a print over time or encourage mould growth on the paper itself. Keep stored prints somewhere cool and properly dry.
Assuming a print alone is enough for identification. A print is a strong supporting piece of evidence, not a standalone answer. Cross-reference colour and morphology against other characteristics before relying on it exclusively.
FAQ
How long does it take to get a good spore print? Most prints develop within a few hours, but leaving the cap overnight typically gives a denser, more reliable deposit for identification or study purposes.
Can I take a spore print from any mushroom? Most gilled or pored fungi will produce a print given a mature enough specimen. Species with very few spores or unusual fruiting body structures can be harder to print successfully.
What do I do with a spore print once I have it? Beyond identification, a fresh print can be examined under a microscope for morphological detail, or used to prepare your own spore syringe. It’s a natural first step before working with our spore syringes if you’re moving on to that stage.
How long can a spore print be stored? Kept cool, dry, and away from light, a well-made print can remain usable for identification purposes for a long time, though spore viability for anything beyond study and colour reference will decline gradually.
Does spore print colour alone confirm a species? No. Spore colour is a strong supporting characteristic, but reliable identification also considers cap shape, gill attachment, habitat, and other features together, rather than any single trait in isolation.
Is a glass slide better than paper for printing? It depends on your goal. Paper or foil gives a clearer visual colour reference, while glass is more convenient if you’re planning to move straight into microscopy afterwards.
Related Guides
- UK Mushroom Identification & Look-Alike Safety Guide
- Liberty Caps vs Lookalikes: UK Identification Guide
- Magic Mushroom Spore Strains Comparison Guide
- Double-Density Spore Syringes: Microscopy & Research Use
- Understanding Mycelium
About This Guide
SporeBuddies has supported UK mycology enthusiasts and researchers for years with spores, microscopy supplies, and practical identification guidance grounded in real hands-on experience. This guide draws on that background to walk you through spore printing clearly, whatever your reason for picking up the technique.
In Summary
Taking a spore print is one of the simplest, most useful techniques available to anyone interested in fungal identification, research, or microscopy. A mature specimen, a still environment, contrasting printing surfaces, and a little patience are all it takes to get a usable result. From there, a good print opens the door to closer study, whether that’s colour-based identification, microscopic examination, or preparing your own spore syringe for further research.
Browse our full range of spore syringes for microscopy and research, or read our mushroom identification guide to learn how spore colour fits into wider identification practice.