Most cultivators judge a mushroom by what they can see with the naked eye. Colour, shape, gill structure, cap size — these traits feel definitive. But here is what experienced mycologists know: the most telling differences between species, strains, and contamination events live far below the surface. Mushroom microscopy opens a precise, reproducible window into that hidden world. Whether you are tracking contamination in your grow room, verifying a spore strain before inoculation, or building genuine taxonomic knowledge, microscopy offers insights that visual inspection simply cannot. This article takes you from the core concepts through to practical technique and advanced methods.
Table of Contents
- What is mushroom microscopy?
- Essential tools and setup for mushroom microscopy
- Step-by-step guide to examining mushrooms under the microscope
- Interpreting microscopic findings: identification and taxonomy
- Common pitfalls and advanced techniques in mushroom microscopy
- Why mushroom microscopy is the overlooked power tool for hobbyists
- Take your microscopy further with Spore Buddies
- Frequently asked questions
Key Takeaways
| Point | Details |
|---|---|
| Proper equipment matters | A compound microscope and good lighting are more important than high magnification alone. |
| Look beyond spores | Combining microscopic and macroscopic features gives the most reliable identification. |
| Accurate measurement is key | Measuring 20–30 spores provides the data needed for trustworthy species ID. |
| Master lighting techniques | Optimising light and contrast dramatically improves what details you can see. |
| Avoid common mistakes | Many errors arise from neglecting lighting, condenser adjustment, or over-relying on single features. |
What is mushroom microscopy?
Mushroom microscopy is the systematic examination of fungal tissue, spores, and microscopic structures using a compound microscope. It is not just a specialist research tool. For UK hobbyists and enthusiasts, it is one of the most reliable ways to deepen your understanding of any species you are working with, whether that is a gourmet oyster mushroom or a more exotic strain you are studying for research purposes.
At its simplest, the process involves preparing a small specimen, placing it on a glass slide, and observing it through progressively higher magnifications. What you find reveals a level of detail that transforms how you understand fungi. Spore shape, surface texture, and internal gill structures all carry information that macroscopic features cannot provide.
The core reasons mycologists use microscopy include:
- Species identification where visible traits overlap between species
- Contamination tracing, identifying bacterial or mould contamination at a cellular level
- Genetic and strain research, particularly useful when comparing multiple cultures
- Advanced cultivation, verifying spore viability and purity before committing to a full grow
The standard methodology involves 400x to 1000x magnification, starting at low power (40x to 100x) to locate the specimen, then gradually increasing magnification. Brightfield transmitted light, proper condenser adjustment, and oil immersion for high-detail work are the established methods for getting reliable results. Starting low and working upward matters more than people realise. Jumping straight to high magnification before locating and centring your specimen is one of the most common beginner errors.
“Microscopy is not just about seeing more — it is about seeing differently. The structural detail in a single spore or gill cross-section can confirm what hours of macroscopic observation cannot.”
For a solid foundation before you pick up a microscope, the beginner guide to mycology microscopy covers the conceptual groundwork that makes practical sessions much more productive.
The real power of microscopy lies in what it reveals that is invisible to the naked eye: verrucose (warty) or smooth spore surfaces, precise length-to-width ratios, the shape and arrangement of cystidia (specialised cells found on gill edges), and hyphal structures within mycelium. None of these features appear in a photograph of the fruiting body. Together, they make mushroom microscopy an indispensable skill for anyone serious about mycology beyond the basic grow-and-harvest cycle.
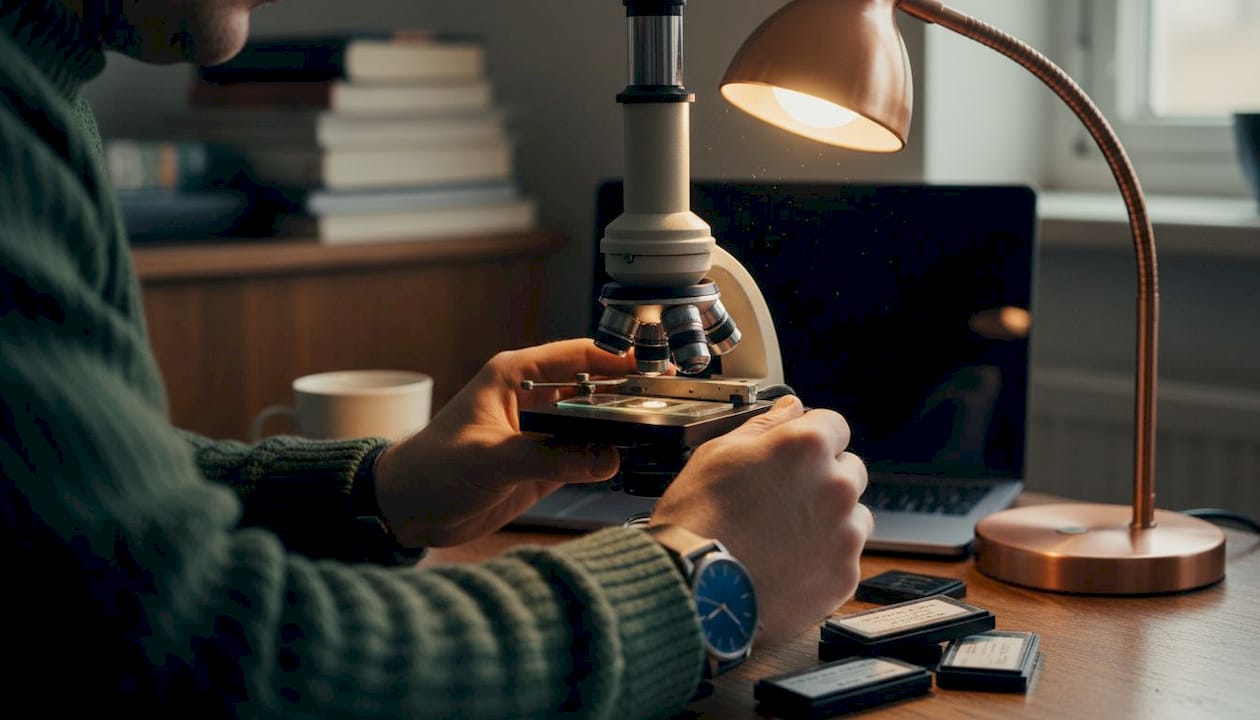
Essential tools and setup for mushroom microscopy
Having defined mushroom microscopy, the next key step is knowing which tools make advanced observation accessible. The good news is that a complete functional setup does not require a laboratory budget.
Your standard kit for mushroom microscopy should include:
- Compound microscope with 40x, 100x, 400x, and 1000x objective lenses
- Glass slides and coverslips (disposable or reusable)
- Stains and dyes such as Melzer’s reagent, Congo red, or cotton blue in lactophenol
- A sharp razor blade for preparing thin tissue sections
- A pipette or dropper for applying water or staining solutions
- Immersion oil for use at 1000x magnification
- Lens cleaning tissue to keep optics sharp and free of debris
One area where beginners often get confused is magnification versus resolution. Many assume a higher magnification number automatically means better results. In reality, lighting and condenser use are often more critical than raw magnification for revealing spore edges and surface texture. A perfectly lit specimen at 400x will show more useful detail than a poorly lit one at 1000x.
Here is a quick reference for the core equipment you will need and what each does:
| Equipment | Purpose | Notes |
|---|---|---|
| Compound microscope | Primary observation tool | 400x minimum for spores |
| Glass slides | Specimen mounting surface | Standard 75x25mm |
| Coverslips | Flattens and protects specimen | Use 0.13-0.17mm thickness |
| Cotton blue in lactophenol | Stains chitin in spore walls | Standard for spore identification |
| Melzer’s reagent | Amyloid/dextrinoid reactions | Diagnostic for species ID |
| Immersion oil | Used at 1000x for clarity | Specific to oil-immersion lenses |
| Razor blade | Sectioning tissue | Surgical grade for thin cuts |
For guidance on selecting individual pieces of equipment, the resource on tools for studying mushroom spores provides detailed recommendations suited to different budgets and experience levels.
Pro Tip: Store all slides, coverslips, and staining reagents in a sealed, dust-free box away from direct light. Dust on a slide or degraded reagent can completely obscure the features you are trying to identify, leading to misreads and wasted specimens.
Once you understand your setup, the next priority is learning how to operate it effectively. Understanding how to study spores under a microscope gives you practical guidance on technique that complements the equipment knowledge above.
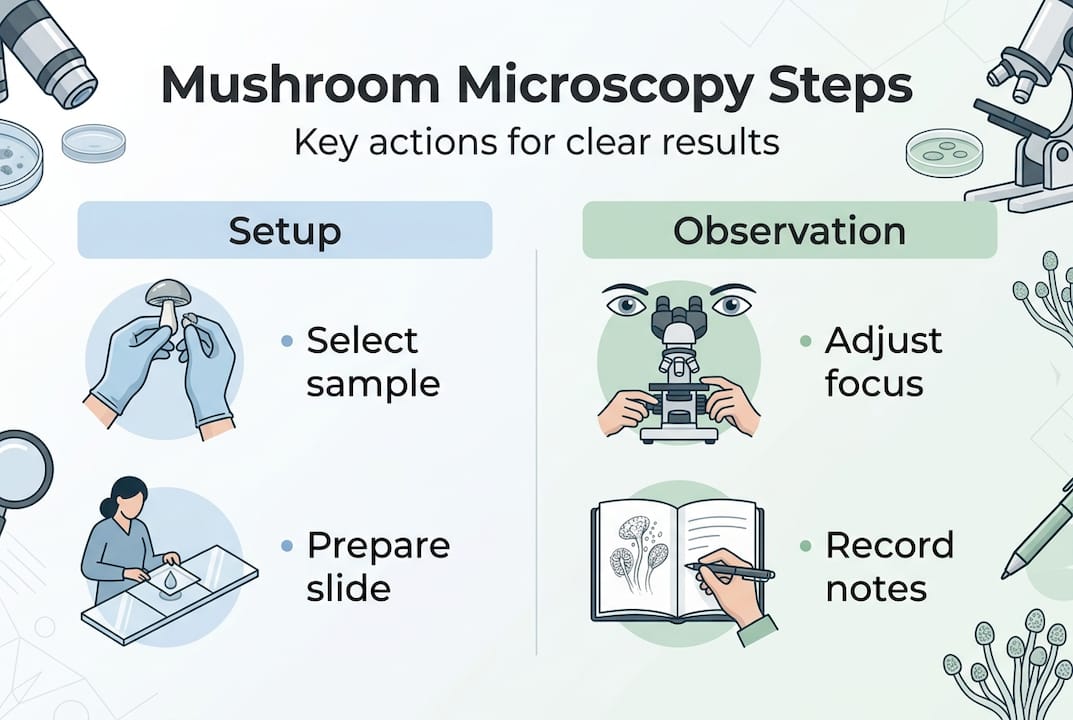
Step-by-step guide to examining mushrooms under the microscope
With your setup ready, let’s break down exactly how to observe meaningful mushroom features under the microscope. The sequence matters as much as the tools.
- Collect and handle your specimen safely. Use clean forceps or a sterile scalpel to collect a small gill section, spore print, or mycelium sample. Avoid touching specimens with bare hands.
- Prepare a spore or tissue mount. For spores, place a small scraping from a spore print onto the slide. For gill tissue, use a razor blade to cut a cross-section as thin as possible. Thin is better — thick sections obscure the structures you need to see.
- Apply your mounting medium. Add a small drop of water, cotton blue in lactophenol, or another appropriate stain directly onto the specimen. Cotton blue stains chitin in the spore walls, making them stand out clearly.
- Lower the coverslip carefully. Use forceps or a needle to lower the coverslip at an angle to avoid air bubbles. Bubbles can be mistaken for spore features and will compromise your reading.
- Start at low magnification (40x or 100x). Locate the specimen area before increasing power. Adjust your condenser and light source at this stage for optimal contrast.
- Move to 400x for spore work. At this level, you can see spore shape, rough surface texture, and approximate size. Measure spores using a calibrated eyepiece graticule if available.
- Apply immersion oil for 1000x observation. Place a single drop of immersion oil directly on the coverslip, then carefully lower the oil-immersion objective lens into the oil. Oil immersion is critical for spores smaller than 8μm or for observing fine surface ornamentation such as warts, ridges, or reticulation.
- Record your observations. Sketch what you see or photograph through the eyepiece with a phone adaptor. Note size, shape, surface features, and any staining reactions.
Pro Tip: Phase contrast illumination, if your microscope supports it, is excellent for transparent structures like hyphal walls and thin gill tissue sections. It increases contrast without the need for chemical staining, which preserves living cellular structures better.
Interpreting microscopic findings: identification and taxonomy
You have mastered the observations; now it is time to make sense of what you see and how it supports thorough mushroom identification.
Measuring and recording spore data is the first step in meaningful interpretation. A calibrated eyepiece graticule lets you measure spore length and width in micrometres (μm). From these measurements, you calculate the Q value, which is the length-to-width ratio. A Q of 1.0 means perfectly round. A Q of 2.0 means the spore is twice as long as it is wide. This single figure carries substantial taxonomic weight.
Key spore features to record include:
- Shape: ellipsoid (egg-shaped), subglobose (nearly round), cylindrical, fusiform (spindle-shaped)
- Surface texture: smooth, verrucose (warty), striate (lined), reticulate (net-patterned)
- Colour in deposit: white, lilac, rusty brown, black (visible on the print, confirmed microscopically)
- Size range: length and width in μm across multiple spores
But spores are only one part of the picture. Here is how different tissue types contribute to identification:
| Tissue type | What it reveals | Key features to note |
|---|---|---|
| Spores | Species group, Q value, ornamentation | Size, shape, surface texture |
| Gill tissue (trama) | Internal gill structure and arrangement | Divergent, parallel, or interwoven hyphae |
| Cystidia | Distinguishing cell types on gill edges | Shape, presence of crystals, thick walls |
| Cuticle (cap surface) | Surface cell arrangement | Pileipellis type, e.g., cutis or trichoderm |
Experts combine spore data with macro features and habitat to reach full taxonomic conclusions. Gill cross-sections and cystidia examination via razor-blade cuts are standard practice in professional identification. You can explore how different strains compare at a microscopic level using spore strain comparisons as a reference point.
“Spore data is the starting point, not the conclusion. Every accurate identification combines what you see under the microscope with what you observe in the field or grow room.”
Common pitfalls and advanced techniques in mushroom microscopy
As you move towards expert practice, understanding typical pitfalls and next-level methods can drastically improve your microscopy outcomes.
Common mistakes to avoid:
- Neglecting condenser adjustment. Many beginners set the condenser once and forget it. Different specimens and magnifications require different condenser positions for optimal contrast and resolution.
- Over-relying on spore appearance alone. A single spore view at one magnification is not sufficient for identification. You need multiple reads, multiple spores, and ideally multiple tissue types.
- Skipping staining. Unstained specimens are much harder to interpret, especially for gill tissue. Cotton blue and Melzer’s reagent each reveal different features and both have a place in your routine.
- Ignoring air bubbles. These distort your view and can be misread as structures. Always lower coverslips at an angle and re-prepare if you see significant bubbling.
- Contaminated reagents. Old or contaminated staining solutions produce unreliable reactions. Replace Melzer’s reagent if it begins to lose its characteristic amber colour.
For accurate and statistically reliable identification, measuring 20 to 30 spores is essential for calculating an accurate Q value, size range, and standard deviation. A single spore measurement tells you almost nothing. Thirty measurements give you a robust dataset.
Advanced techniques worth learning:
- Phase contrast microscopy: Reveals transparent structures (hyphal walls, flagella) without staining by converting phase differences in light into visible contrast.
- Darkfield illumination: Useful for viewing spore outlines and surface ornamentation with dramatic contrast, particularly effective for smooth-walled spores where features are subtle.
- Fluorescence microscopy: Less common for hobbyists but increasingly accessible. Fluorescent dyes can reveal specific cell components not visible under brightfield conditions.
Pro Tip: Join a UK mycology society or online group such as the British Mycological Society community or active UK Facebook mycology groups. Sharing microscopy images with peers accelerates your interpretation skills faster than any book. Peer feedback on ambiguous findings is invaluable and community members are genuinely generous with their knowledge.
For a dedicated resource on practical spore research, the spore research and microscopy guide offers focused guidance on working with spore syringes and setting up reliable research sessions.
Why mushroom microscopy is the overlooked power tool for hobbyists
Here is an honest observation after working alongside the UK mycology community for some time: most beginner guides spend 80% of their microscopy content on magnification numbers and almost none on lighting, condenser technique, and specimen preparation. That is the wrong priority order.
Magnification without resolution gives you a blurry enlarged image of nothing useful. Proper condenser alignment, optimised light intensity, and appropriate staining give you actual structural detail. You will learn more from a well-prepared slide at 400x than a poorly prepared one at 1000x.
The second overlooked truth is that beginners fixate on spores because they are the obvious target. But the real taxonomic depth lies in gill sections, cystidia, and cuticle structure. These are the features that separate species within the same genus, and they require proper sectioning technique and staining to reveal.
Microscopy is not reserved for professional mycologists with institutional microscopes. With a decent entry-level compound microscope, basic reagents, and methodical practice, any hobbyist in the UK can make findings that matter, whether that is confirming a clean culture or catching contamination before it ruins a grow. The barrier is not equipment. It is knowing where to focus your attention and building the patience to prepare specimens carefully.
Take your microscopy further with Spore Buddies
Ready to take your mushroom microscopy to the next level? Spore Buddies stocks a wide range of mycology equipment and supplies suited to both beginners setting up their first microscopy station and more experienced cultivators upgrading their kit. You will also find a carefully curated selection of mushroom spores for microscopy, giving you reliable, high-quality specimens to practise with and study in depth. And if you want to connect microscopy knowledge directly with your growing practice, the home growing mycology guide brings both disciplines together in a single practical resource. Everything you need to go deeper is right here.
Frequently asked questions
What magnification is best for mushroom spores?
A compound microscope with 400x to 1000x magnification is ideal for observing mushroom spores and fine surface detail. Most identification work happens at 400x, with 1000x reserved for the finest features.
Is oil immersion really necessary for all spores?
Oil immersion is critical for spores under 8μm or for examining fine surface ornamentation, but larger, clearly defined spores can often be studied effectively at 400x without it.
Do I only need to look at spores for identification?
No. Spores alone are insufficient for accurate identification; you should combine microscopic features including cystidia and gill structure with macroscopic traits and habitat information for reliable results.
How many spores should I measure for reliable ID?
Measure 20 to 30 spores to calculate accurate averages, Q values, and standard deviations. Fewer measurements produce unreliable data that can mislead identification.
Why is lighting more important than magnification?
Correct lighting and condenser use sharpen detail and reveal spore edges and surface texture far more effectively than increasing magnification alone, particularly when specimens are thin or lack strong natural contrast.
Recommended
- Tools for Studying Mushroom Spores | Agar & Microscopy Essentials – Spore Buddies
- Beginner Guide to Mycology Microscopy (UK): Tools, Magnification & Spore Study Spore Buddies
- How to Study Mushroom Spores Under a Microscope – Spore Buddies
- Spore Print to Slide Workflow: Preparing Mushroom Spores for Microscopy Spore Buddies