Beginner Guide to Mycology Microscopy
Educational note: This guide is for mycology education and microscopy. It explains how beginners study fungal structures such as spores with microscopes. If your concern is unknown mushrooms around pets, children, or gardens, start with Mushroom Identification Safety (UK).
Start here: For the full UK overview, see Identify “Magic Mushrooms” in the UK.
Quick answers
- What is mycology microscopy? The study of fungi using a microscope, often focusing on spores and other small structures.
- What microscope do beginners use? Usually a compound brightfield microscope for spores and slide-based observation.
- What magnification is useful? Many mushroom spores can be observed around 400×, with higher magnification sometimes used for finer detail.
Jump to
What is mycology microscopy?
Mycology microscopy is the study of fungi using a microscope. In beginner practice, that usually means learning how to observe spores, tissue fragments, and other small fungal structures that cannot be seen clearly with the naked eye.

It is one of the safest and most useful ways to learn fungal biology because it shifts attention away from guesswork and toward careful observation. Instead of relying only on colour or shape in photographs, microscopy helps you slow down and study what is actually present on a slide.
Answer-first
What do beginners usually look at first? Most beginners start with spores, because spores are central to fungal reproduction and are one of the easiest microscopic features to compare once you have a spore deposit or simple slide.
Why mycologists study mushroom spores
Spores are microscopic reproductive cells released by fungi. They matter in microscopy because many mushrooms that look similar in ordinary conditions can still show useful differences when their spores are examined under magnification.
Spore study helps with:
- Observation: learning to recognise shape, distribution, and general appearance
- Comparison: seeing how one sample differs from another
- Documentation: recording what you observe instead of relying on memory alone
- Mycology skills: building confidence with slides, focus, and lighting
For beginners, spores are a practical starting point because they connect naturally with spore prints, simple slide preparation, and microscope observation.
A simple principle
Spore microscopy is not about “one magic answer.” It is about building a repeatable way to observe fungal material carefully and compare what you see over time.
Microscopes used in mycology
Beginners usually encounter two broad categories of microscope in mycology: compound microscopes and stereo microscopes. Each is useful for a different kind of observation.
Compound microscope
This is the main beginner tool for studying spores. It is designed for slide-based viewing and is the best choice when your goal is to observe small structures under transmitted light.

Stereo microscope
A stereo microscope is useful for surface viewing and general specimen inspection. It is helpful for looking at whole structures at low magnification, but it is not the main beginner tool for studying spores in detail.
Best beginner choice
If you only buy or use one microscope for early mycology learning, make it a compound brightfield microscope. It is the most practical tool for spores, slides, and foundational microscopy skills.
Understanding magnification
Magnification sounds technical, but the beginner version is simple: you start low, find the specimen, then increase gradually until you can see the features you want to study.
Common magnification steps
- 40× – orientation and locating the slide area
- 100× – broader specimen view
- 400× – a very useful working level for many spores
- 1000× – sometimes used for finer detail depending on optics and setup

Answer-first
What magnification do beginners actually need? For most beginner spore observation, 400× is the most practical target. It is high enough to reveal useful spore detail without making the workflow overly difficult.
One of the biggest beginner mistakes is jumping straight to high magnification before the sample is centred and in focus. Always find the specimen first, then move upward.
What mushroom spores look like
Under magnification, mushroom spores can appear in a range of shapes and styles. Early on, your goal is not formal taxonomy — it is learning to notice the obvious differences clearly.
Common spore shape categories
- Round
- Oval
- Elliptical
- Angular
- Ornamented
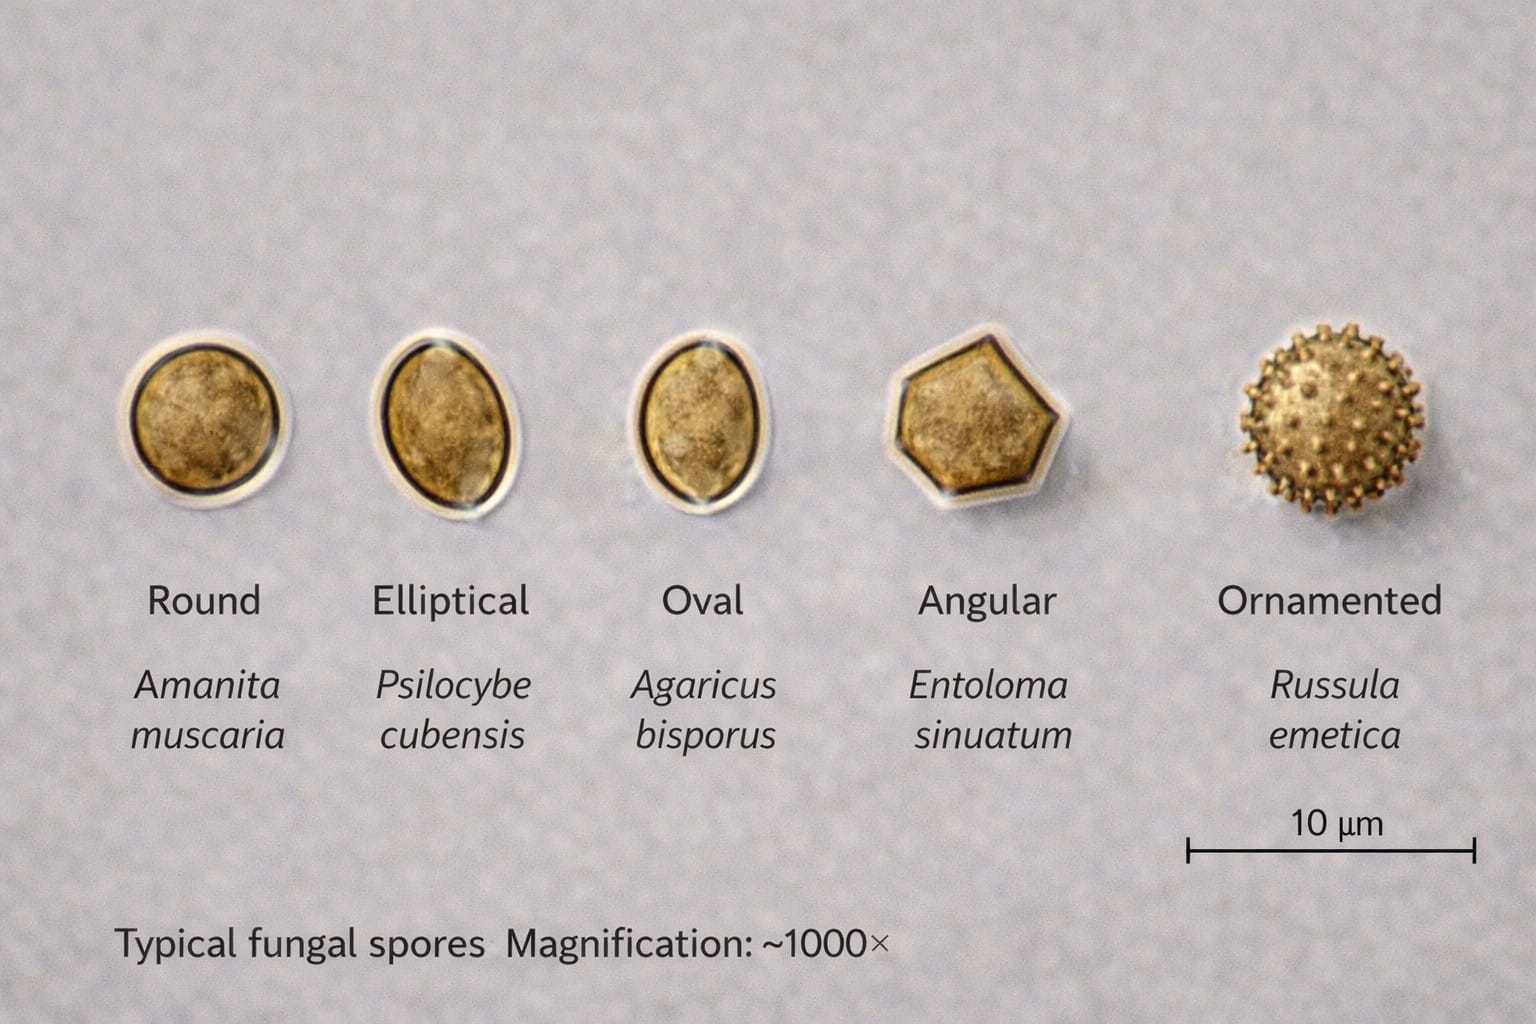
Different species can produce spores with different shapes, sizes, and apparent textures. That is why a well-prepared slide is so helpful: it lets you compare real structures instead of relying only on printed descriptions.
Useful related guides
Basic mycology microscopy workflow
The easiest way to think about mycology microscopy is as a simple sequence. You do not need to master everything at once. You only need a repeatable, beginner-friendly routine.
- Observe the material – decide what you want to study
- Collect spores or sample material – often from a visible spore print
- Prepare a simple slide – keep the sample thin and viewable
- View under the microscope – start low, then increase magnification gradually
- Record what you see – shape, distribution, clarity, lighting notes
Answer-first
What is the easiest workflow for a beginner? Learn spore prints first, then move to a spore print to slide workflow, then study the result under a microscope. That sequence is simple, logical, and beginner-friendly.
Once you are comfortable with that rhythm, the next stage is improving consistency: cleaner slides, better contrast, steadier focus, and better note-taking.
Common beginner mistakes
Most beginner problems come from setup, not from a lack of intelligence or a “bad eye.” A few small adjustments usually make a big difference.
Top mistakes to avoid
- Using too much sample – creates a dark smear instead of a clear field
- Starting at high magnification – makes it harder to find the specimen
- Too much light – washes out edges and reduces contrast
- Dirty slides or optics – adds haze and false artefacts
- Not documenting observations – makes learning slower and less consistent
A good beginner habit
After each session, write down:
- what was on the slide
- what magnification you used
- whether the sample was thin or thick
- what you could and could not see clearly
That one habit can improve your progress more than expensive equipment.
Spore prints vs microscopy vs field observation
Each method tells you something different. Used together, they create a stronger learning pathway than any one method alone.
| Method | What it shows best | Main limitation |
|---|---|---|
| Spore print | Spore colour in mass | Does not usually identify a species by itself |
| Microscopy | Spore shape, spread, and small structural detail | Requires slide preparation and practice |
| Field observation | Overall mushroom structure and visible features | Photos and conditions can be misleading |
Next steps for learning mycology
This page is your microscopy hub. From here, the best next step is to choose the part of the process you want to improve.
Recommended SporeBuddies learning path
If you arrived here from a broader UK safety search, use the main educational hub: Identify “Magic Mushrooms” in the UK.
FAQ
What is mycology microscopy?
Mycology microscopy is the study of fungi using a microscope, often focusing on spores and other very small fungal structures.
Can mushroom spores be seen with a microscope?
Yes. That is one of the most common beginner uses of a compound microscope in mycology.
What magnification is best for studying spores?
For many beginners, around 400× is the most practical working magnification because it balances visibility and ease of use.
Do all mushrooms produce spores?
Mushrooms are reproductive structures of fungi, and spores are central to fungal reproduction, which is why spore study is so important in mycology education.
What should I learn first: spore prints or microscopy?
Spore prints are usually the easiest starting point. Once you understand what a spore print shows, microscopy becomes much easier to approach.
Sources
- [1] British Mycological Society – “How to Make a Spore Print.” britmycolsoc.org.uk (PDF)
- [2] Imperial College London – “Fungi prints instructions.” imperial.ac.uk (PDF)
- [3] Microscopy education resources on brightfield microscopy and slide observation.