Contamination in cultivation is one of the most common and frustrating challenges faced by mushroom growers at every experience level. Whether you’re working with agar plates, spore syringes, liquid culture, grain spawn, or ready-to-use grow bags, understanding how to prevent contamination in mycology is essential for consistent results and healthy mycelium.
Contamination in mushroom spores and contamination in mushroom substrate can appear at any stage of the process. Early identification is critical. If you’re asking what does contamination look like or what can I do about contamination, this guide provides clear answers, practical prevention strategies, and proven workflows used by experienced cultivators and laboratories.
If you need additional help and cannot find an answer here, please contact us via the support page.
Contamination in mushroom cultivation refers to the growth of unwanted organisms, such as moulds, bacteria, or yeasts, alongside or instead of the intended fungal culture.
These contaminants compete for nutrients, release inhibitory by-products, and can stall or destroy mycelial growth. Because fungal spores and microbes are ubiquitous in the environment, contamination cannot be eliminated entirely, only reduced through proper technique.
Common signs of contamination include non-white growth (such as green, black, grey, or pink patches), slimy or wet textures, and sour or unpleasant odours.
Effective contamination prevention relies on sterile technique, clean working environments, controlled airflow, and correctly prepared substrates.
Sterilisation is used for nutrient-rich materials such as grain and agar, while pasteurisation is typically sufficient for bulk substrates.
When contamination is detected, affected materials should be isolated and disposed of safely to prevent further spread.
In mycology, contamination refers to unwanted organisms growing alongside—or instead of—your intended fungal culture. These organisms compete for nutrients, release inhibitory compounds, and can completely stall or destroy mycelial growth.
Common contaminants include:
Moulds (such as Trichoderma)
Bacteria
Yeasts
Wild airborne spores
Because fungal spores are microscopic and ubiquitous in the air, contamination cannot be eliminated completely. The goal of clean technique is to reduce exposure, improve sanitation, and allow healthy mycelium to outcompete unwanted organisms.
Most contamination events can be traced back to one or more of the following causes:
Poor or rushed sterile technique
Inadequate cleaning or sanitation
Improper sterilisation or pasteurisation
Dirty air or uncontrolled airflow
Overly wet substrates or stressed mycelium
Healthy mycelium grown under clean conditions is surprisingly resilient. In the majority of cases, contamination is the result of process errors rather than chance. One of the most common hidden causes is moisture: learn field capacity and contamination to prevent wet, oxygen-poor substrate conditions.
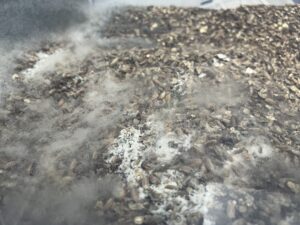
Trichoderma is one of the most aggressive and destructive contaminants in mushroom cultivation. It often begins as white mycelium before turning green as it sporulates.
Common sources include:
Poorly sterilised grain
Contaminated agar transfers
Dirty grow spaces or tools
Once established, Trichoderma spreads rapidly and should be isolated or discarded immediately.
Black mould is usually a sign of severe contamination and poor environmental hygiene. It is commonly associated with:
Damp, stagnant grow areas
Old or improperly stored substrates
Black mould contamination typically requires full disposal of affected materials.
Bacterial contamination often presents as:
Slimy or wet patches
Sour, sweet, or fermented odours
Stalled or patchy mycelial growth
It is commonly caused by:
Overhydrated grain
Dirty syringes or spore sources
Poor gas exchange during incubation
Yeasts grow quickly and are most often seen in liquid culture, appearing cloudy or creamy rather than fibrous.
They are usually introduced through:
Non-sterile inoculation
Inadequately cleaned containers
Contamination prevention in mushroom cultivation relies on: cleaning all surfaces and tools, using proper sterile technique for needles and transfers, sterilising equipment where needed, controlling airflow, and working methodically without rushing.
Mastering these principles will dramatically reduce contamination across all stages of cultivation.
Sterile technique is not optional. It is the foundation of contamination prevention.
Wash hands thoroughly before every session
Wear gloves and disinfect them frequently
Use 70% isopropyl alcohol (not 99%)
Flame-sterilise tools between every transfer
Avoid unnecessary movement while working
Rushing or skipping steps almost always leads to contamination.
A still air box reduces airborne contamination by eliminating air movement, making it useful for hobby and beginner work. Laminar flow hoods use HEPA filters to clean incoming air and are more effective in frequent culture work and expanded agar transfers.and culture expansion. While more expensive, they significantly reduce contamination when used correctly.
Agar work is where clean cultures are established and contamination is most easily identified.
Best practices:
Use properly sterilised agar plates
Open plates minimally and at an angle
Flame-sterilise scalpels before every transfer
Transfer only from strong, clean mycelium
Reduce condensation by cooling plates correctly
Agar allows contamination to be isolated early, making it one of the most powerful tools in contamination control.
Grain spawn is a high-risk stage due to its nutrient density.
To prevent contamination during grain spawn preparation, hydrate grain correctly (not overly wet), sterilise at the appropriate pressure and duration, cool containers completely before inoculation, and avoid shaking until mycelium has established.
Shake grain only after mycelium has established
Any grain that smells sour, sweet, or fermented should be discarded immediately.
Spores are not sterile by nature. Proper handling is essential.
Best practices:
Always assume spores carry contaminants
Use agar to clean spores before expansion
Store spore prints in dry, sealed conditions
Avoid touching prints directly
Flame-sterilise needles where applicable
Clean spores combined with agar work result in significantly cleaner cultures.
To heat or not to heat the needle?
Heat or wiping of needles is not recommended, as it can compromise sterility. Needles are sterilised and should be attached only when ready to inoculate.
Heating or wiping sterile needles can compromise sterility rather than improve it.
Your cultivation environment plays a major role in contamination prevention.
Maintain a clean grow space by:
Regularly disinfecting surfaces
Avoiding carpets and fabrics
Managing humidity without standing moisture
Keeping pets and plants out of grow areas
Dust, excess moisture, and neglect are prime contributors to contamination.
Understanding the difference is critical:
Sterilisation (pressure cooking): destroys all organisms
Pasteurisation: reduces harmful organisms while preserving beneficial microbes
Grain and agar must be sterilised. Bulk substrates are typically pasteurised. Using the wrong method increases contamination risk.
Contamination can appear as:
Any colour other than white mycelium
Fuzzy or hairy patches in green, blue, black, yellow, or red
Unpleasant or sour odours
Slimy or wet textures
Bruising may appear blue, and spores themselves are often dark purple or black. When in doubt, isolate or discard.
If contamination is detected:
Isolate the affected material immediately
Do not open contaminated containers indoors
Dispose of contaminated substrate safely
Review your sterile technique and workflow
Trying to salvage contaminated grows usually results in further spread.
Avoid these frequent errors:
Working too quickly
Skipping alcohol sanitation
Reusing dirty tools
Overhydrating substrates
Opening containers unnecessarily
Ignoring early warning signs
Clean mycology rewards patience and consistency.
Successful cultivators develop habits that reduce contamination over time:
Consistent workflows
Proper storage of equipment and cultures
Routine cleaning schedules
Learning from failed attempts
Contamination is part of the learning process—but it should become increasingly rare.
There are several grow kits with reduced contamination risk. The Inject & Forget kits as well as the All in one kits sold in our store are designed to stay sealed until you want to harvest the grow kit. This type of grow kit reduces the risk of airborne contamination to 0% giving you the best chances of success even on your first time.
Learning how to prevent contamination in mycology is a skill refined through practice. Each clean transfer, healthy culture, and successful grow reinforces good habits.
By controlling your environment, applying disciplined sterile technique, and respecting fungal biology, you greatly increase your chances of success.
Clean work is not complicated—it is careful, calm, and consistent.
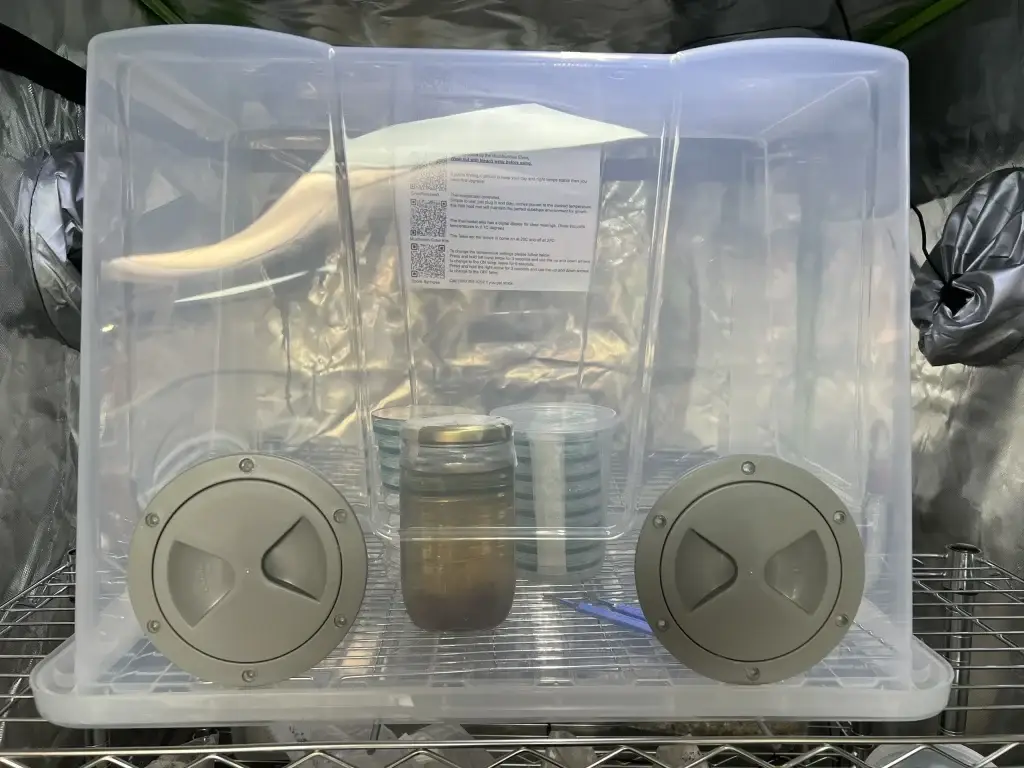
Perfect for beginners and pros alike, the MycoSAB still air box for mushrooms is a solid, high-quality solution for keeping your work sterile and your results consistent. Whether you’re transferring agar, inoculating grain, or studying spore samples, this is the tool that keeps your workspace contamination-free

The perfect companion for sterile work in mycology. Whether you’re inoculating grain, working with agar, or transferring cultures, this Pop-Up Still Air Box for mushrooms gives you the clean, still environment you need, without the bulk. Reduce Contamination and increase success with this pop up still air box.
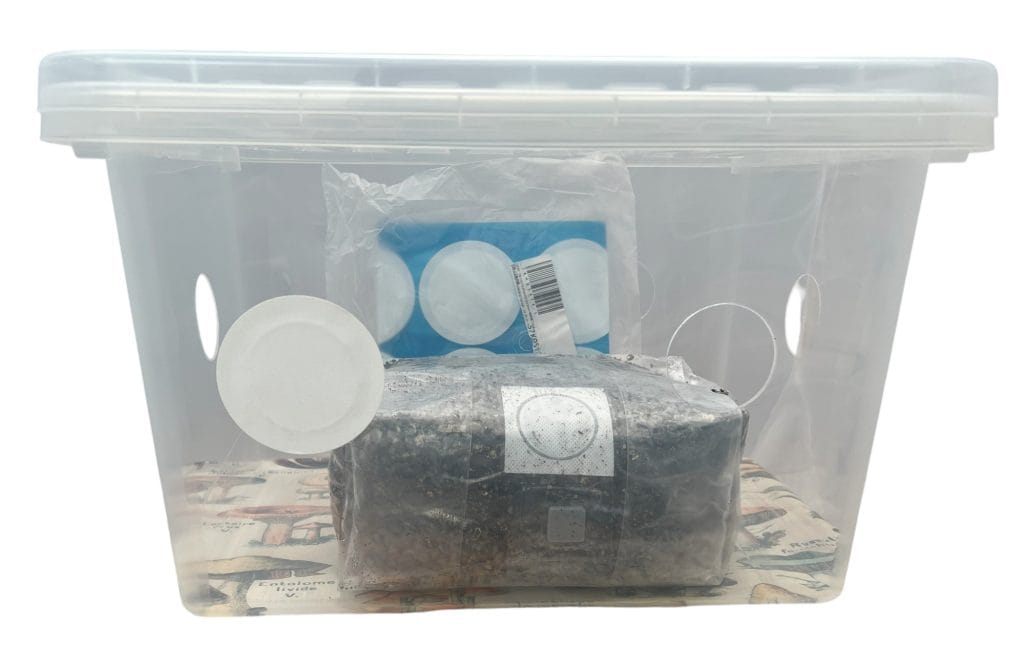
This mushroom monotub is purpose-built for controlled cultivation at home. It includes pre-drilled ventilation holes and stick-on filter patches that make managing airflow and contamination easier than ever. It’s compact enough for tight spaces yet offers plenty of room for serious results.
Never….. Please never wipe or heat the needles we send you.
The needles we provide with every spore syringe are British Medical Quality. Our needle supplier also supplies the NHS.
The needles come Gamma Irradiated and housed in a sealed packet. Just unscrew the black tip from the syringe and screw the colored end of the needle in its place. Only take the needle protector off when you are ready to use.
It is unlikely that you will see Contamination in your mushroom spore syringe. The Dark pieces or shading you are seeing is Mushroom Spores.
We do test the spore solution in much the same way our customers do before sending. We feel that viewing the spore solution under microscope before sale helps us reduce your chances of viewing contamination. With experience, customer error does account for a large majority of potential problems. We also understand that we can not view every ML of spore solution we sell.
If you do have a spore solution contamination issue. Please report the spore syringe that your were studying under microscope to the team.
If you have an issue with contaminated substrate please let us know as soon as the contamination is seen. Contaminated substrate on delivery will be replaced asap.
Always send picture to help us understand the problem.
Many thanks.
Please allow 2-3 weeks of uninterrupted fruiting conditions before trying manual fruiting.
So, if you have had a bag in fruiting conditions for more than 28 days and it has not started to fruit. You may not have warm enough temps around the upper part of the bag. Make sure you have a clear box or similar over the sprinkle bag and heat mat to help keep the heat in. Please now take a manual fruiting approach.
1. Open bag at top
2. Spray the 4 inner sides of the bag
3. Fan the top of the bag to drive fresh air into the bag for 30 seconds
4. Seal the bag back up and leave alone enjoy your day
5. Repeat the fanning misting process every morning and evening until you see small pins form.
6. When pins form please leave the bag sealed and the mushrooms will grow.
7. Should take 2-3 weeks to fruit
8. If bag does not work then the fruiting conditions have not been satisfied
9. Fruiting conditions are 26 – 27 degrees and similar light levels found in a normal family lounge.
10. NO DIRECT SUNLIGHT “TREAT LIKE A VAMPIRE”
Unfortunately any growth that is not white. Fury OR Hairy round spots of dark Blues, Greens, Reds, Yellows and any other color of the rainbow other that white growth is contamination. Spores are black to purple in color. Bruising can be light to dark blue.
A very short answer is nothing. If it showing in the substrate, it is already over growing the gourmet species you wanted to grow. Some tiny spots of fungal growth will not affect the fruits but may spread fungal spores around your other efforts. Contaminated projects should be discarded and reported to the team here at SporeBuddies.com
Its ok.
We fall and we stand up.
Life is full of little set backs and mycology is a learning process too. Take a seat and think about where and how the contamination started. This will help you prevent it from happening again. Perhaps the kit has dried out? Perhaps you panicked and just threw it in the bin only 4 days into the fruiting cycle….
Don’t worry you can do it. Contact the team for some advice and try again.
Problems with our substrate are rare and your feed back is always appreciated. Please report any problems as we are happy to offer replacements within reason.
| What You See or Smell | Likely Contamination | Where It Appears | What To Do |
|---|---|---|---|
| Green patches (often starts white) | Trichoderma (green mould) | Grain, substrate, agar | Isolate immediately and discard |
| Slimy grain, sour or sweet smell | Bacterial contamination | Grain jars/bags, LC | Discard and review hydration & sterilisation |
| Black fuzzy growth, musty smell | Black mould | Substrate, grow area | Discard – do not open indoors |
| Cloudy liquid, creamy swirls | Yeast or bacteria | Liquid culture | Do not expand – restart from clean agar |
| Any colour other than white | General contamination | All stages | Isolate or discard immediately |
Needs some contamination help?